Breadcrumbs CSS
Breadcrumb Styling example I wrote.
I need to double check browser support. Add a fallback for IE 11 and add mobile support.
Breadcrumb Styling example I wrote.
I need to double check browser support. Add a fallback for IE 11 and add mobile support.
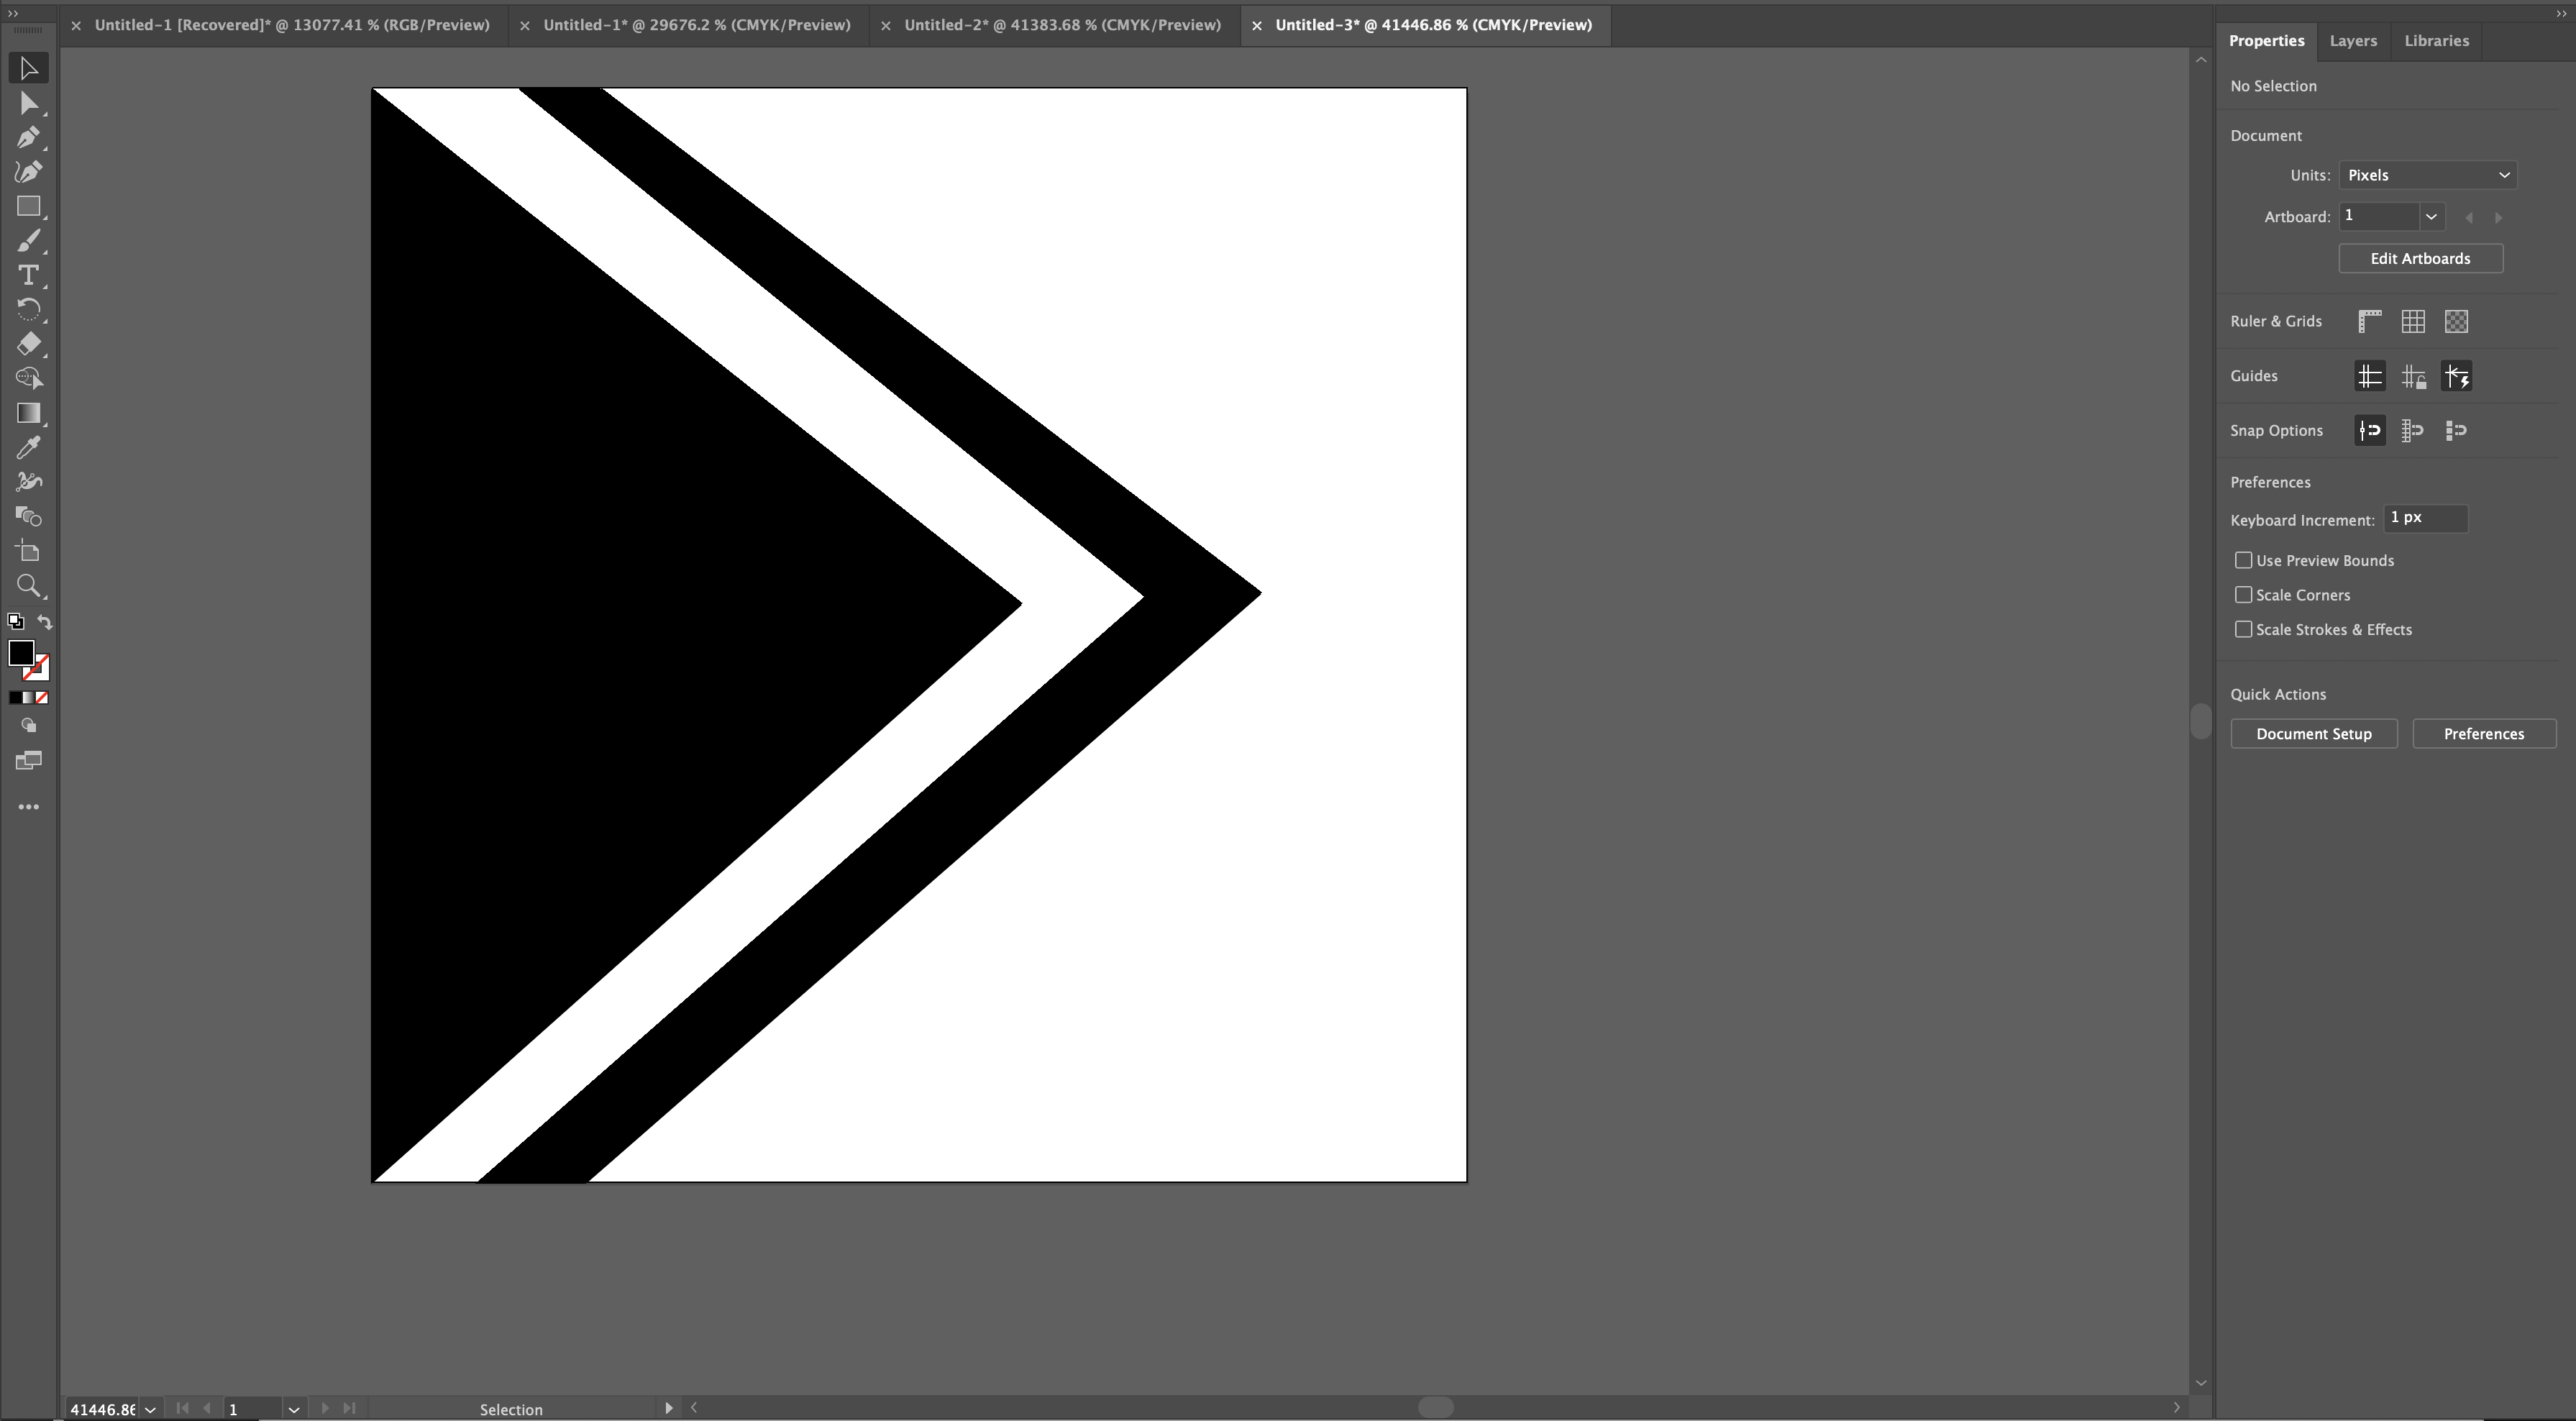
CSS clip path can be useful for creating complex scalable shapes in webdesign.
Create a new file 1px high and 1px width*
*This is required because for the svg to be scalable the path coordinates need to be between 0 and 1.
Draw your shape out.
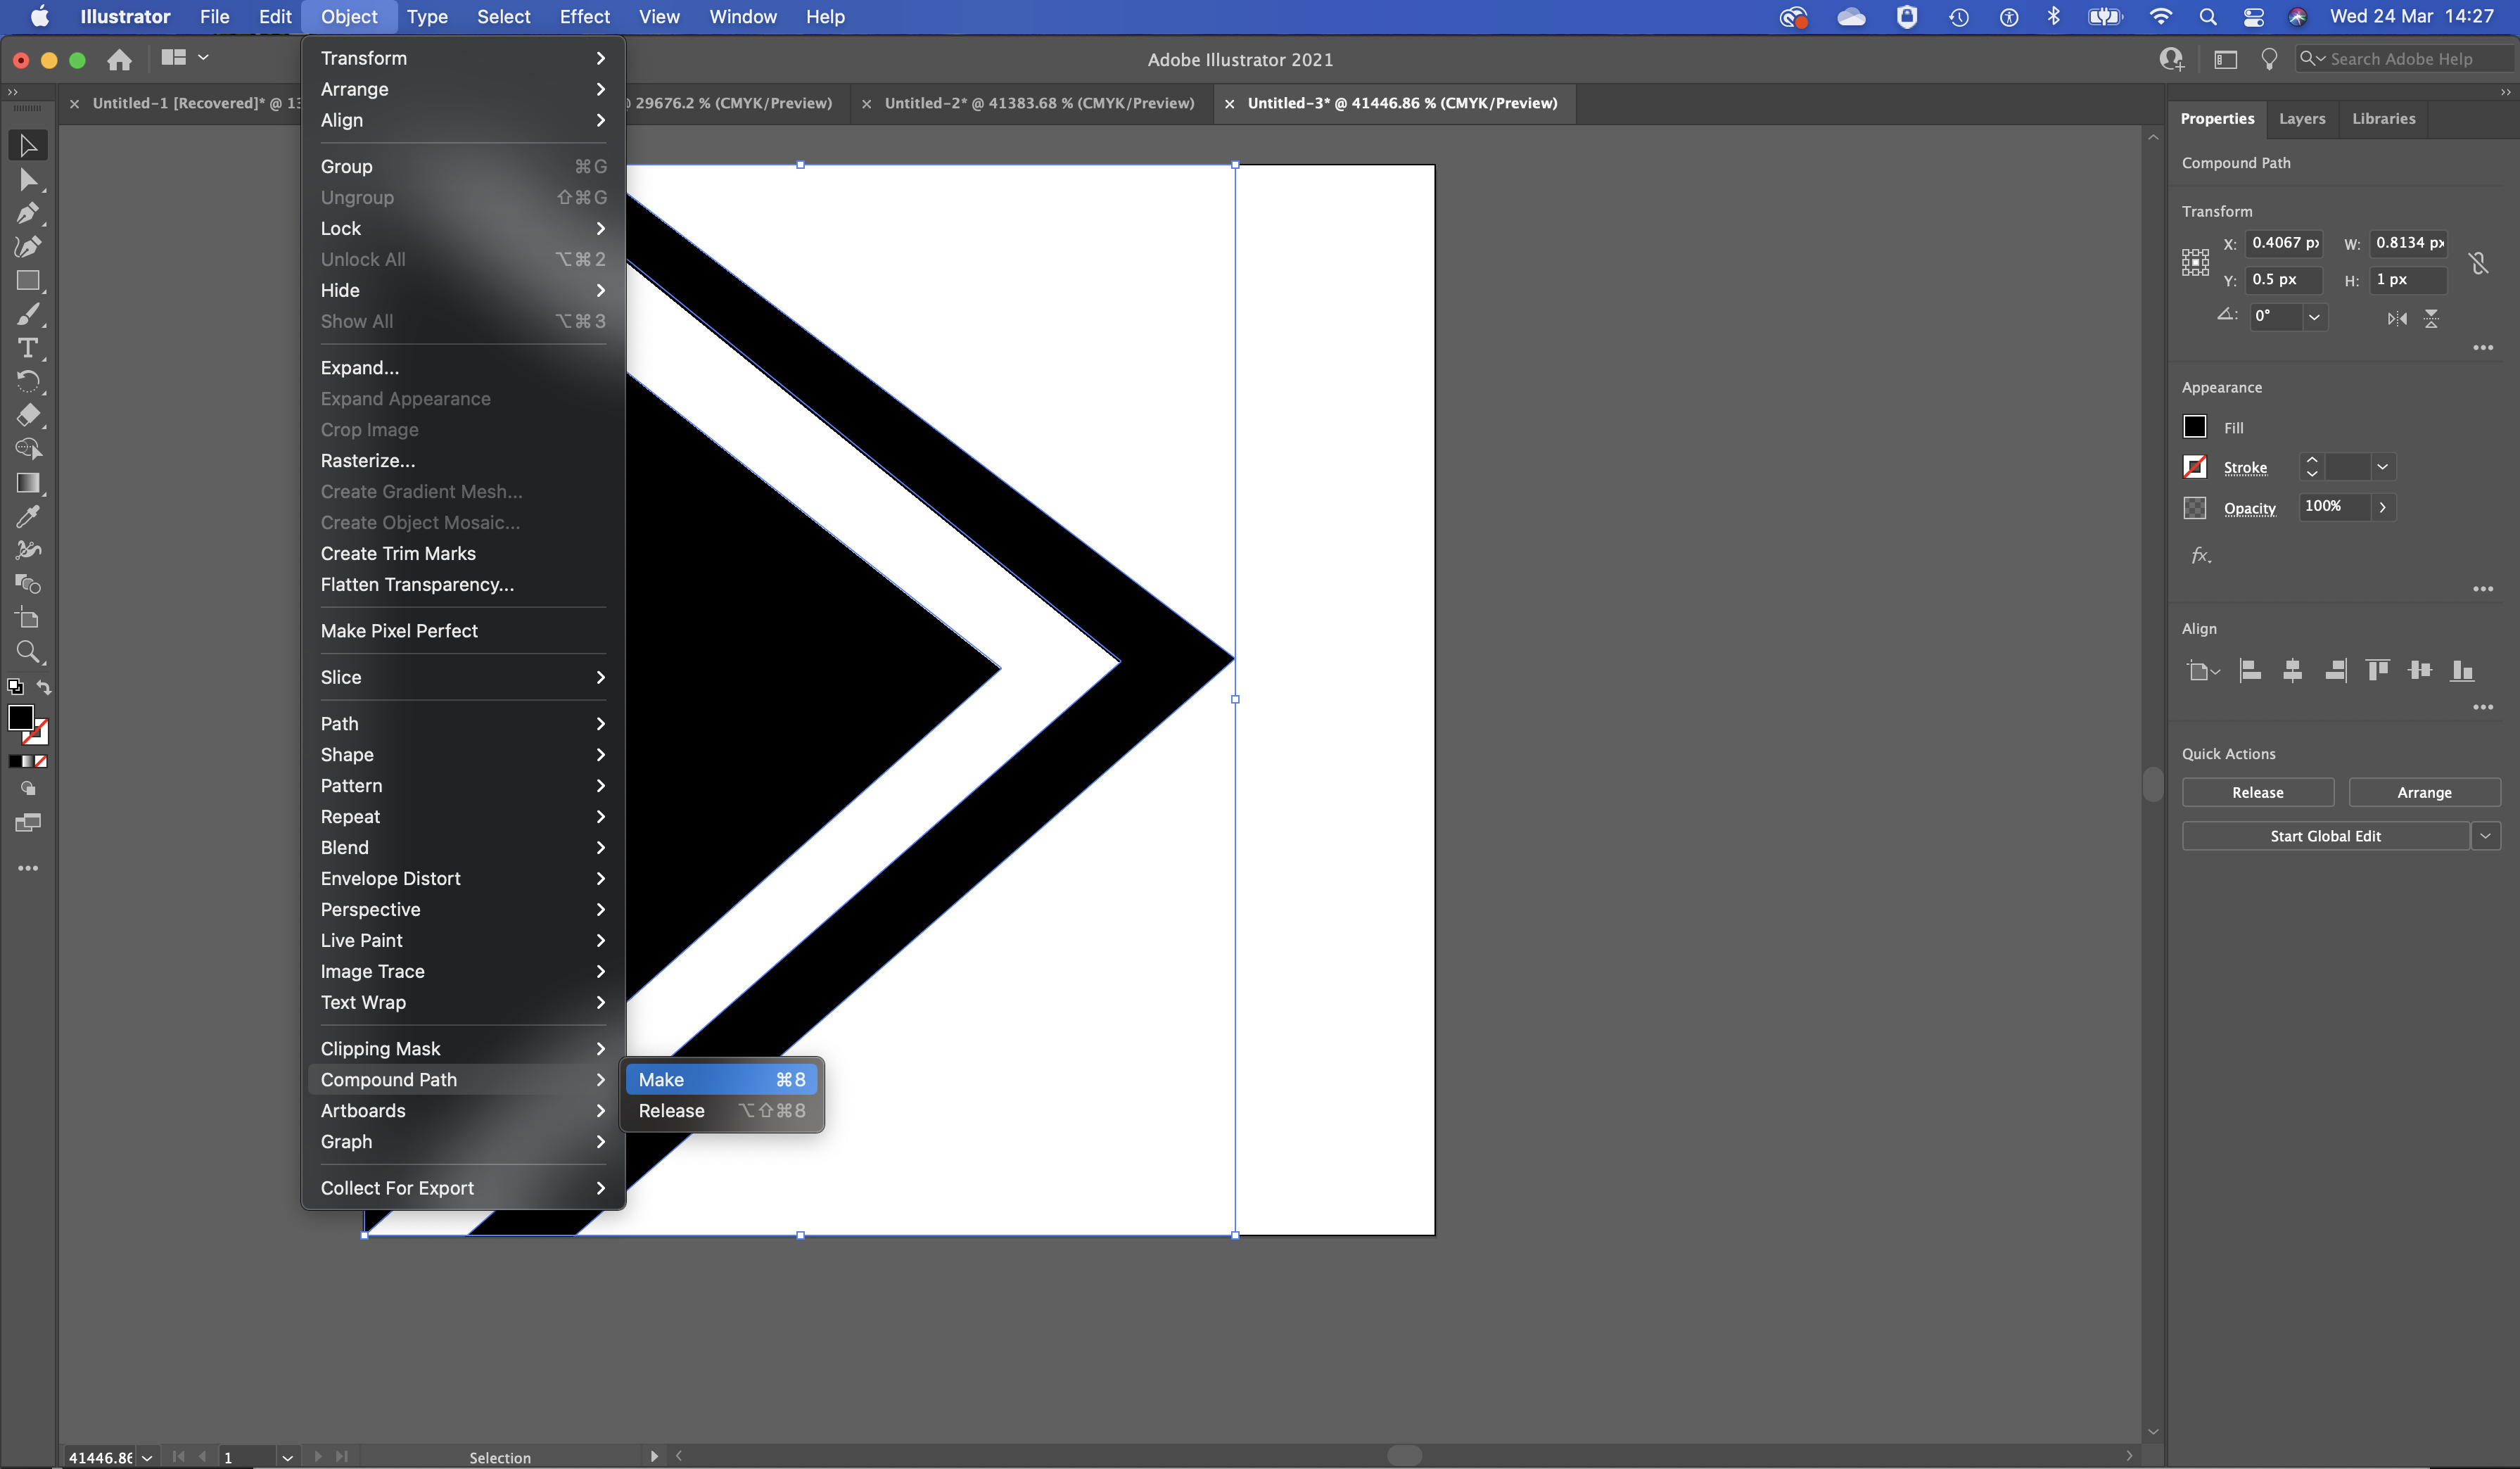
Select your shapes and go to Object > Compound Path > Make.
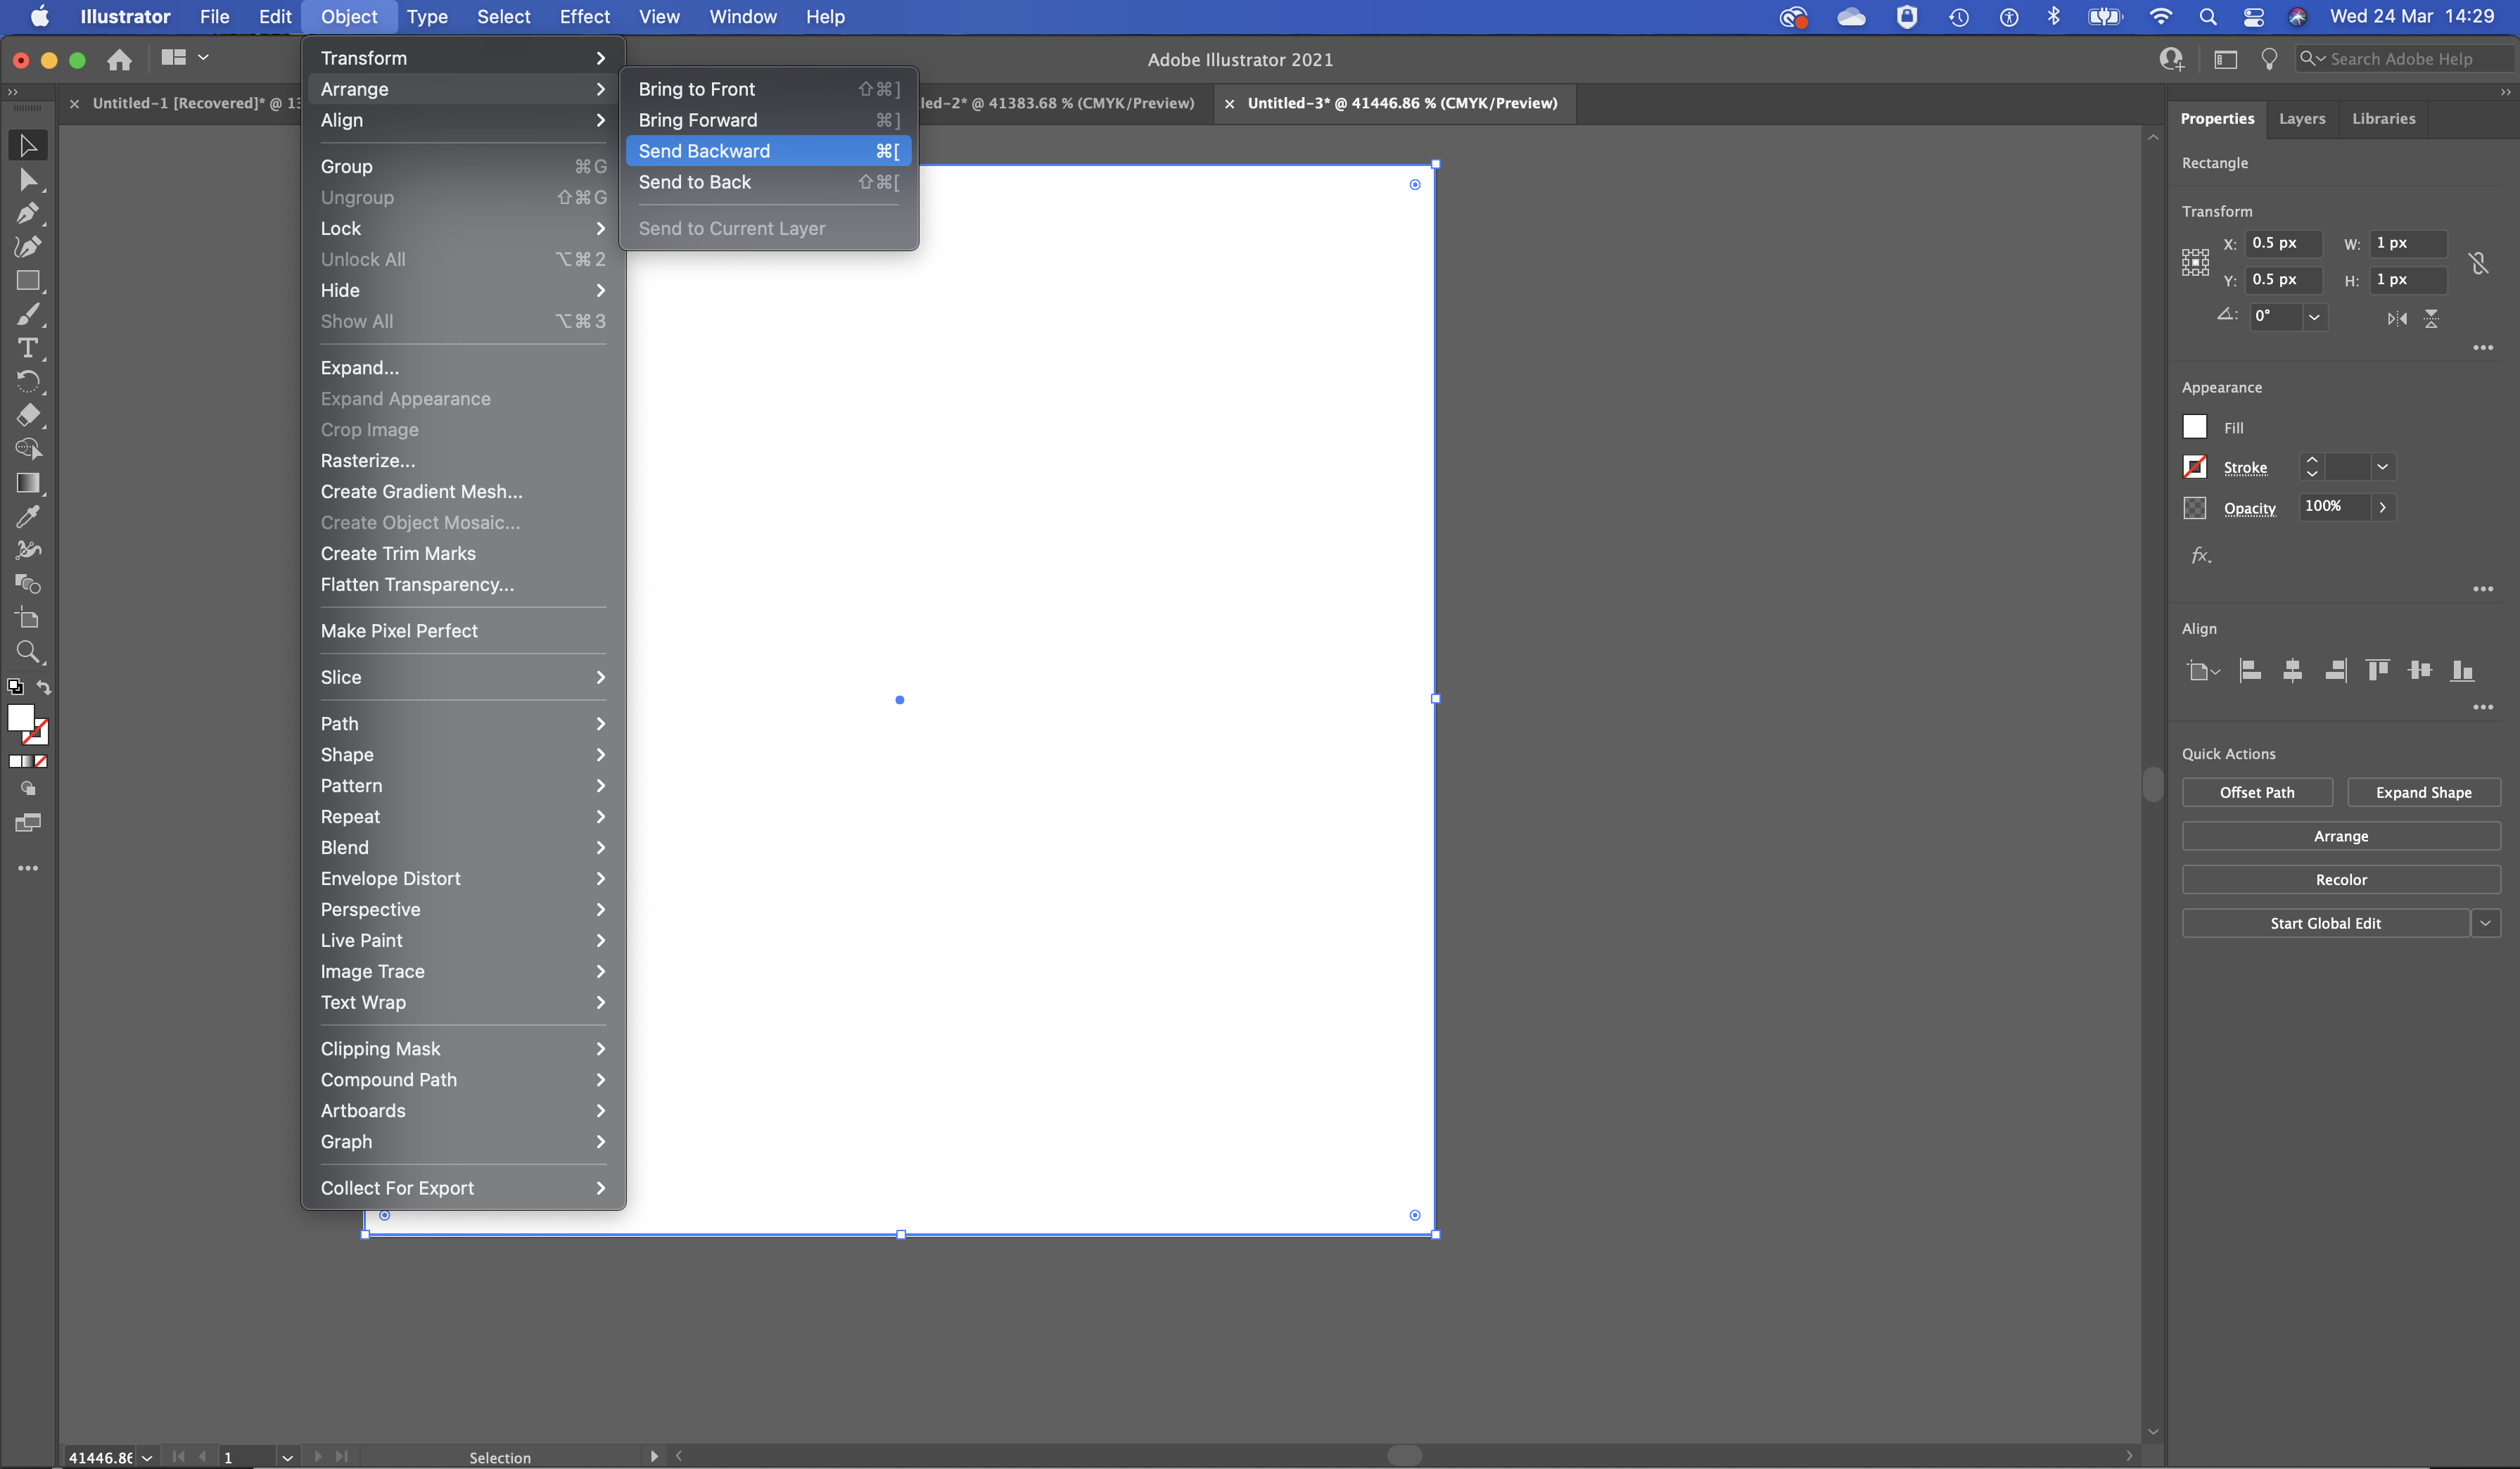
Draw a rectangle around your shapes (keep within the bounds of the 1px by 1px artboard.
Select that shape then send it to the back so your drawn shape is in front.
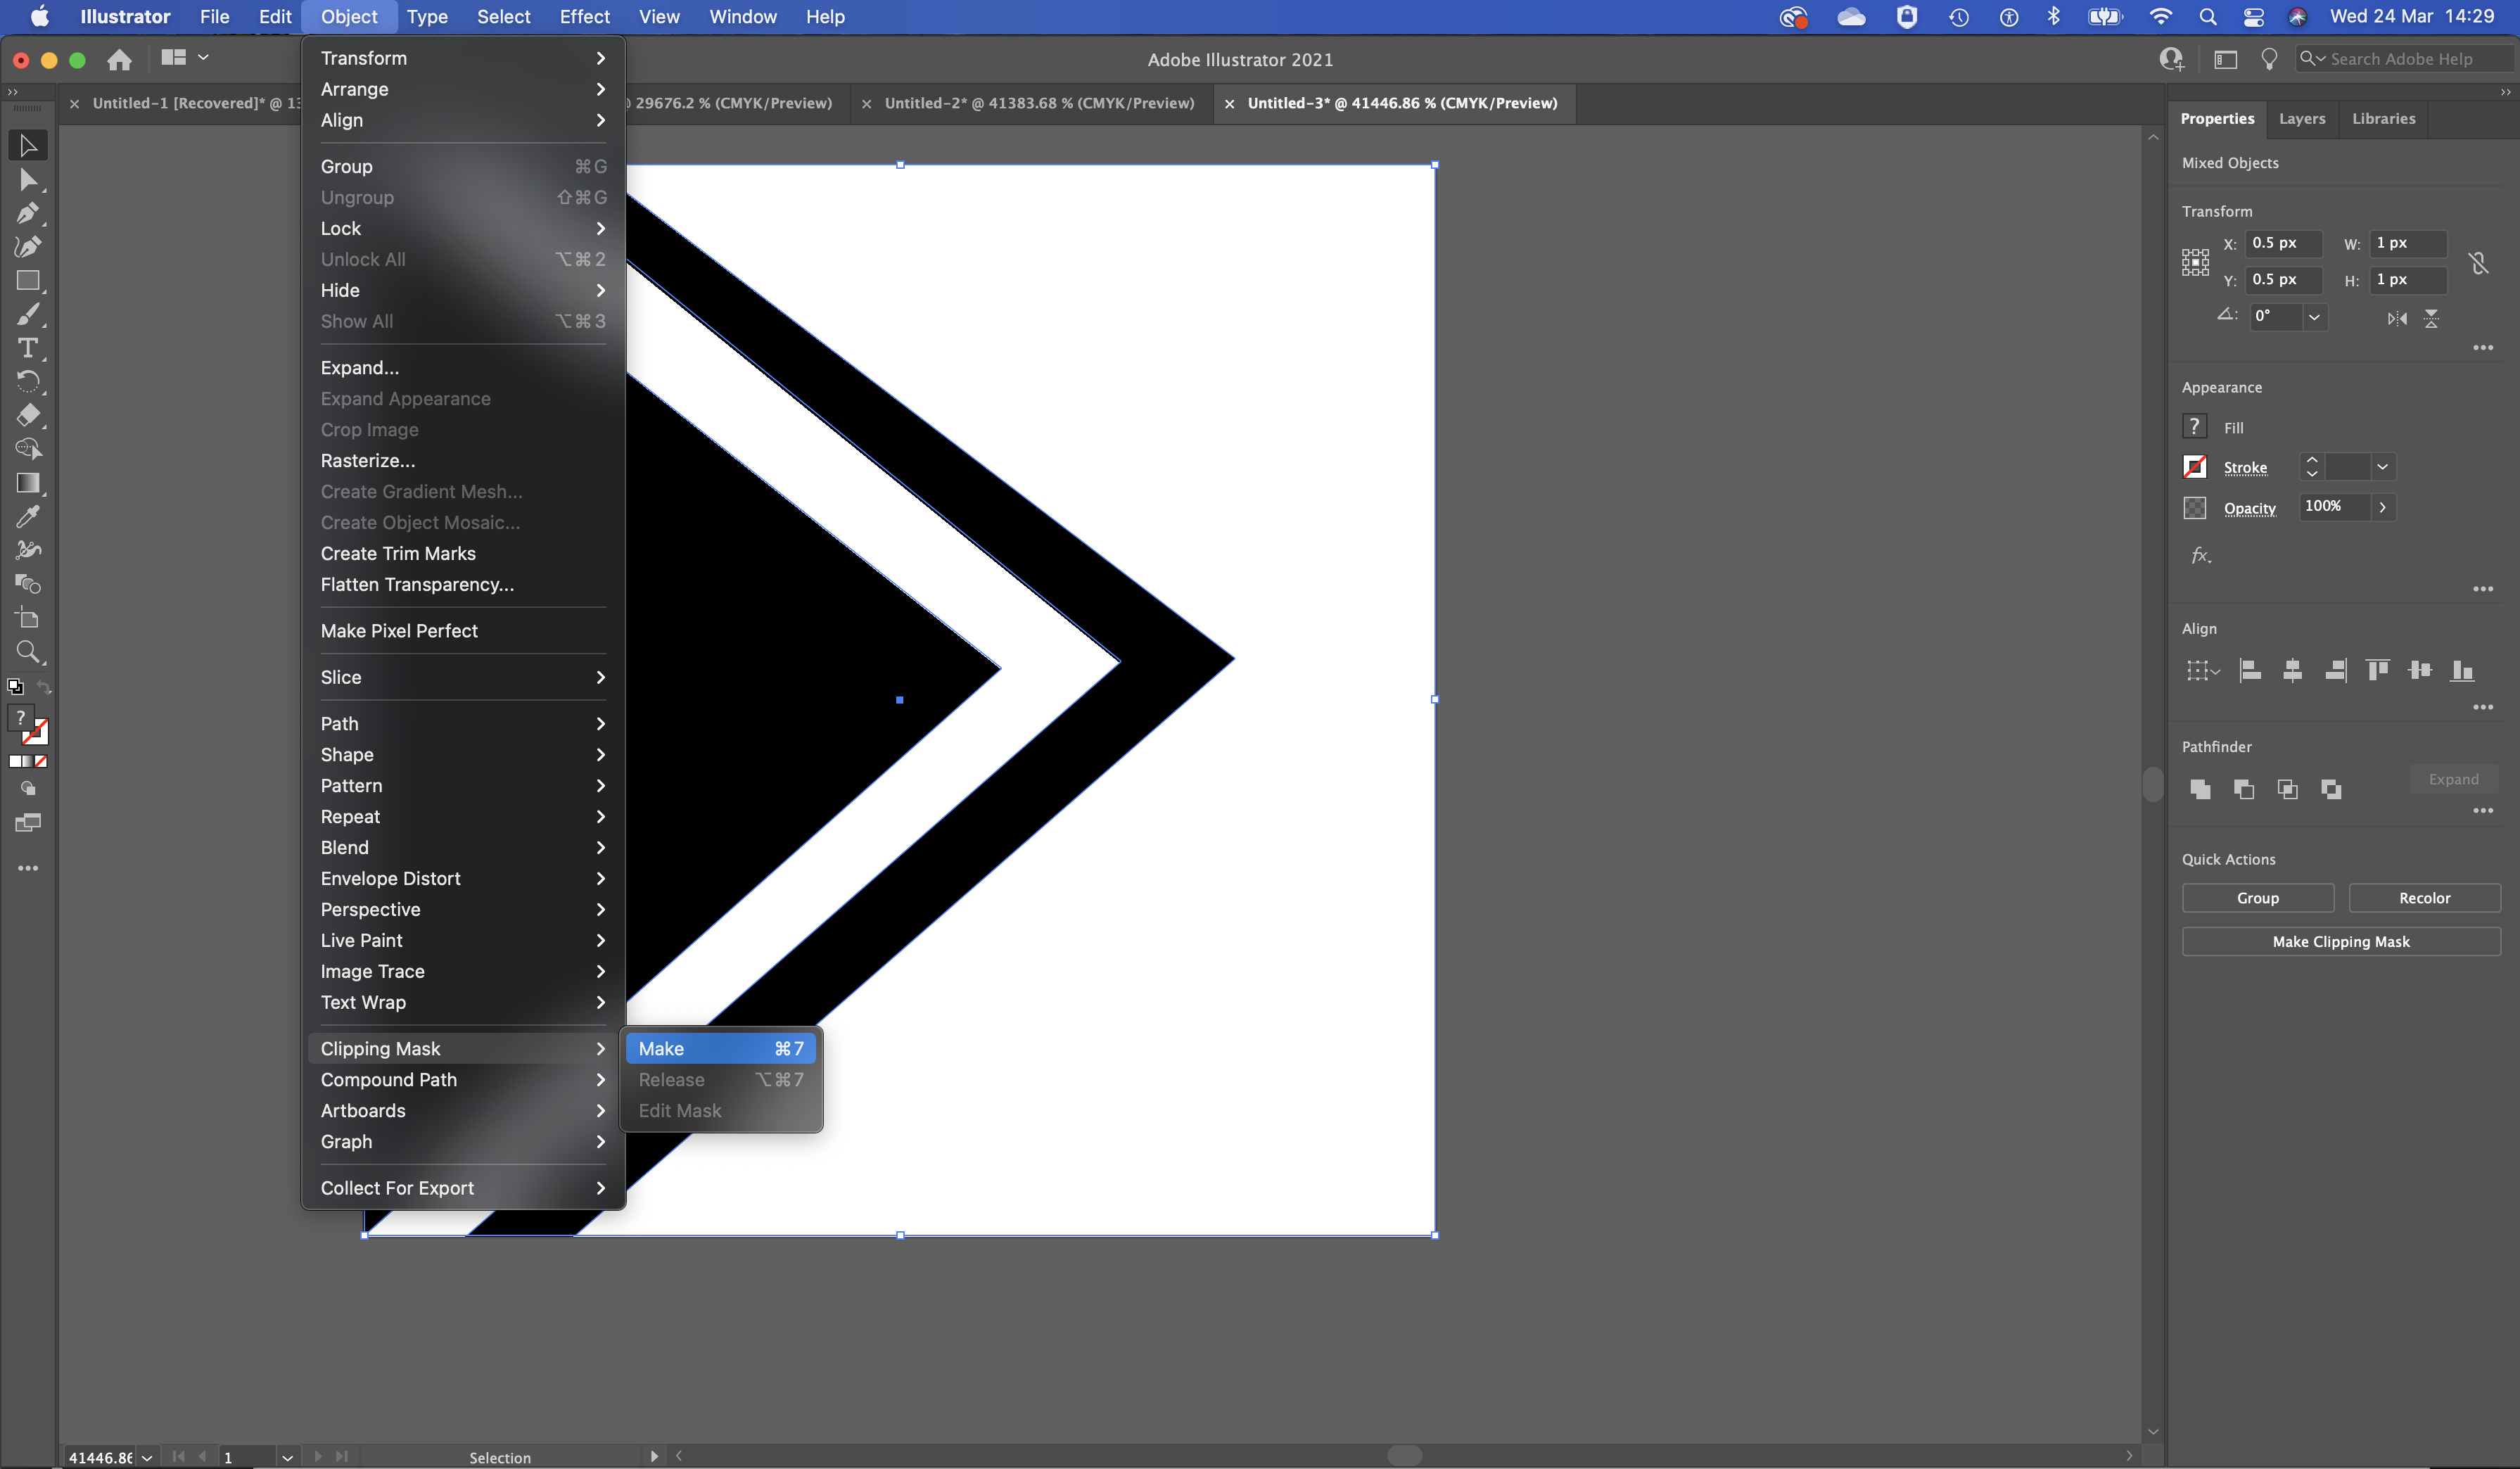
Select both your shape and the box and go to Object > Clipping Mask > Make to change your shape into a clipping mask.
Go to File > Export > Export As to export your vector as an SVG.
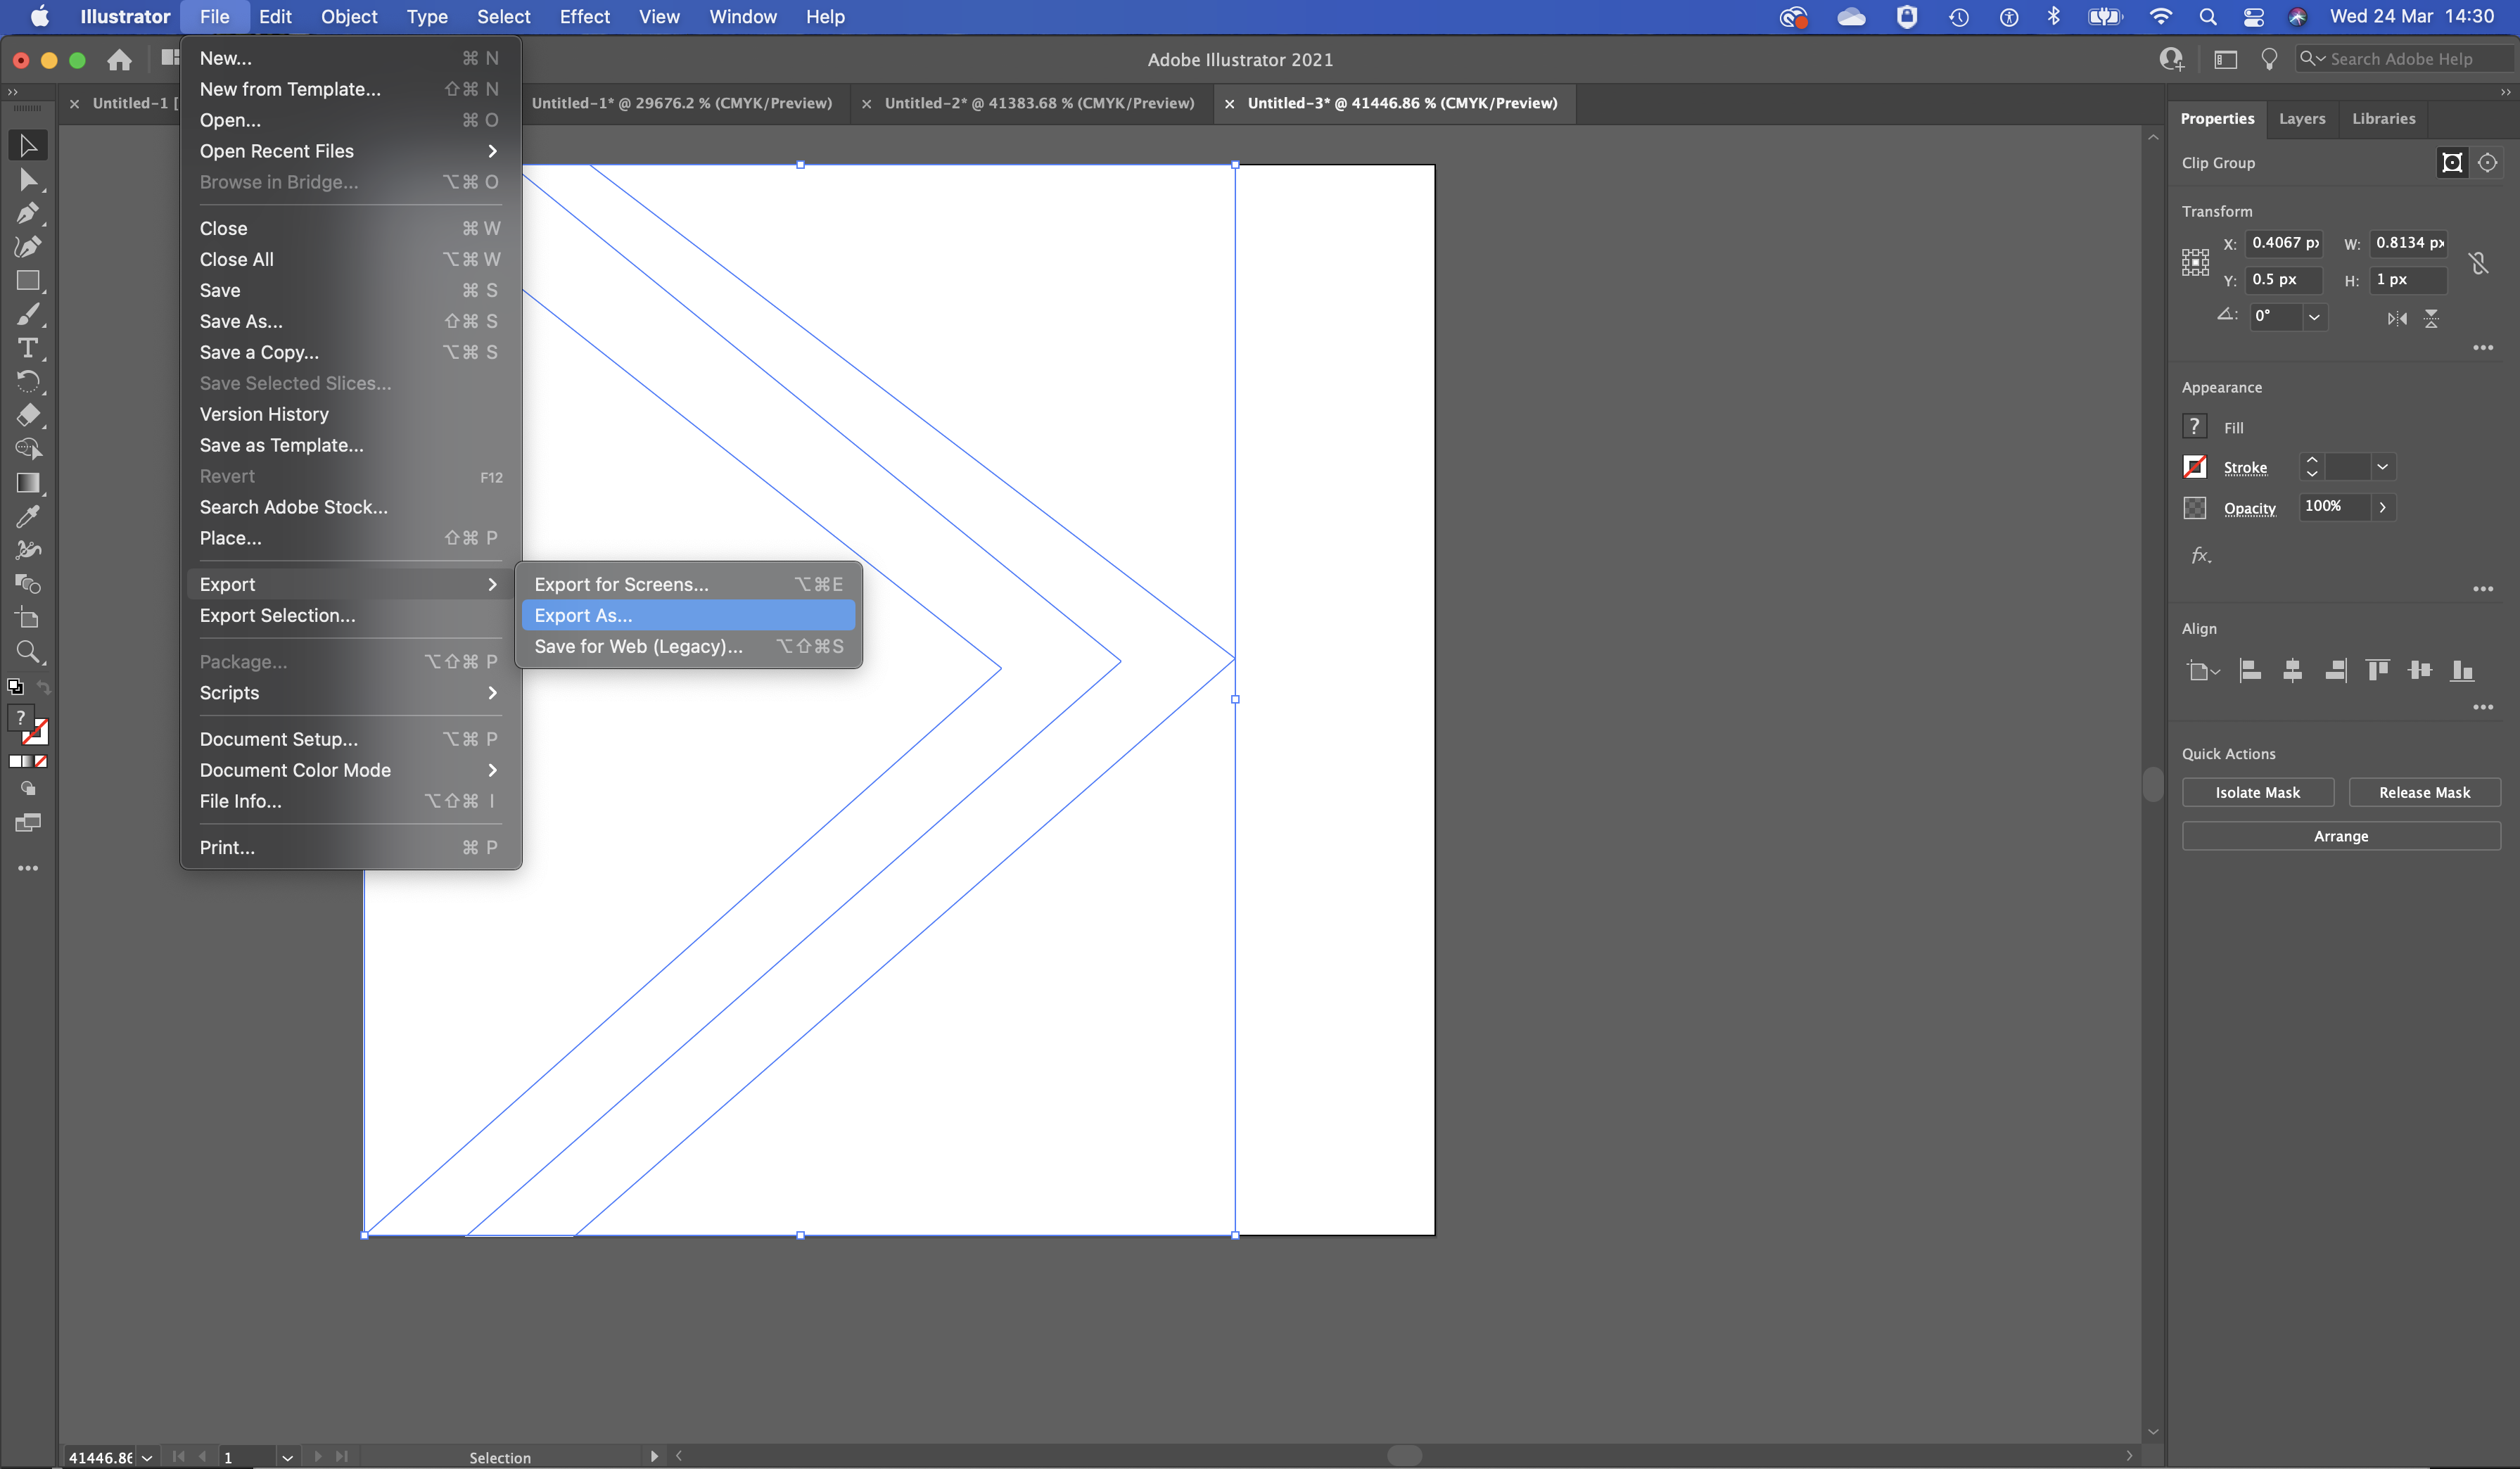
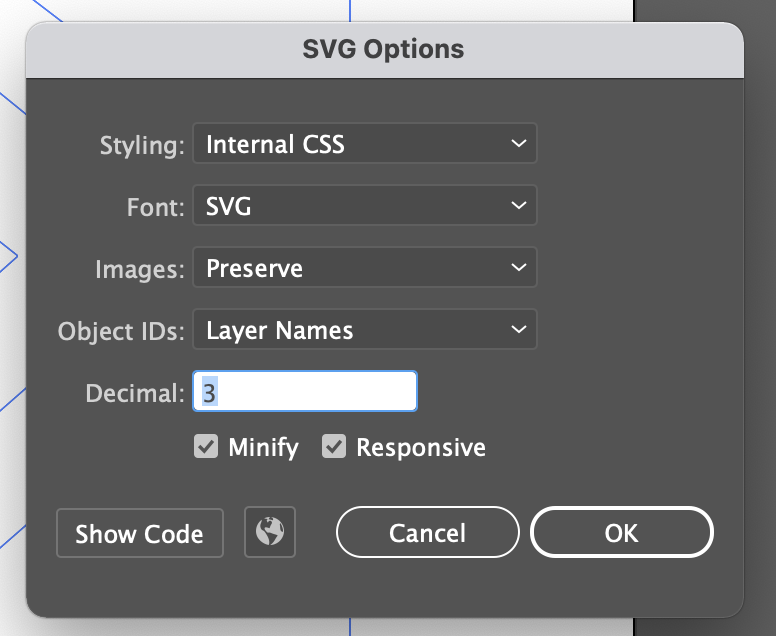
Open the svg file into a code editor like Kate and you should see something like this.
<svg id="Layer_1" data-name="Layer 1" xmlns="http://www.w3.org/2000/svg" xmlns:xlink="http://www.w3.org/1999/xlink" viewBox="0 0 1 1">
	<defs>
		<style>.cls-1{fill:none;}.cls-2{clip-path:url(#clip-path);}.cls-3{fill:#fff;}</style>
		<clipPath id="clip-path">
			<path class="cls-1" d="M0,0,.6.47,0,1ZM.136,0,.707.464.1,1H.2L.813.461.21,0"/>
		</clipPath>
	</defs>
	<g class="cls-2"><rect class="cls-3" width="1" height="1"/></g>
</svg>
You need to modify this a bit to use as a mask.
<svg id="Layer_1" data-name="Layer 1" xmlns="http://www.w3.org/2000/svg" xmlns:xlink="http://www.w3.org/1999/xlink" width="0" height="0" viewBox="0 0 1 1">
	<defs>
		<clipPath id="clip-path" clipPathUnits="objectBoundingBox">
			<path class="cls-1" d="M0,0,.6.47,0,1ZM.136,0,.707.464.1,1H.2L.813.461.21,0"/>
		</clipPath>
	</defs>
</svg>.banner {
height: 140px;
width: 200px;
background-color: black;
position:relative;
}
.banner:after {
content: ' ';
display:block;
position: absolute;
right:-100px;
bottom: 0px;
height: 100%;
width: 100px;
background-color: black;
-webkit-clip-path: url("#clip-path"); /* required for Webkit/Blink browsers if you're using only inline SVG clipping paths, but not CSS clip-path */
clip-path: url("#clip-path");
}If you want an SVG to only be at the top. Add a height to the SVG.
(example to follow later).
https://www.smashingmagazine.com/2015/05/creating-responsive-shapes-with-clip-path/
https://www.webdesignerdepot.com/2015/01/the-ultimate-guide-to-svg/
https://cssfordesigners.com/articles/clip-path-scaling
https://css-tricks.com/using-svg/
https://webdesign.tutsplus.com/tutorials/website-layouts-with-svg-shapes–cms-35259
https://caniuse.com/?search=clip-path
IE 11 does not support this.
Some browsers will need fallback support.
https://stackoverflow.com/questions/21904672/internet-explorer-and-clip-path
The below headers can be added to any site’s .htaccess (with modifications) to help make it more secure. They can also be set on the server in the apache security.conf file.
By wary of the Content-Security-Policy as this is the one most likely to break a site and will need heavily modified to include all the scripts and style libraries you use on your website.
# Extra Security Headers
<IfModule mod_headers.c>
	Header set X-XSS-Protection "1; mode=block"
	Header always append X-Frame-Options SAMEORIGIN
	Header set X-Content-Type-Options nosniff
	Header set X-Permitted-Cross-Domain-Policies "none"
	Header set Strict-Transport-Security "max-age=31536000; includeSubDomains; preload"
	Header set Referrer-Policy 'same-origin'
	# Header set Feature-Policy "geolocation 'self'; fullscreen 'self' https://www.google.com;"
	Header set Permissions-Policy "microphone=(), camera=(), geolocation=(self), fullscreen=(self \"https://www.youtube.com\"), accelerometer=(self \"https://www.youtube.com\"), autoplay=(self \"https://www.youtube.com\"), clipboard-write=(self \"https://www.youtube.com\"), encrypted-media=(self \"https://www.youtube.com\"), gyroscope=(self \"https://www.youtube.com\")"

	Header set Expect-CT enforce,max-age=2592000,report-uri="https://www.example.com/report"
	Header add Content-Security-Policy "default-src 'self' *.youtube.com *.youtube-nocookie.com *.bootstrapcdn.com *.gstatic.com *.googleapis.com *.doubleclick.net *.googletagmanager.com *.google-analytics.com *.google.com; connect-src 'self' *.google-analytics.com; style-src 'self' 'unsafe-inline' *.bootstrapcdn.com *.googleapis.com; script-src 'self' *.youtube.com *.youtube-nocookie.com *.google-analytics.com *.google.com *.googleapis.com *.googletagmanager.com *.jquery.com *.bootstrapcdn.com 'unsafe-inline';"
	SetEnvIf Origin "http(s)?://(www\.)?(example.co.uk|youtube.com)$" AccessControlAllowOrigin=$0$1
    Header add Access-Control-Allow-Origin %{AccessControlAllowOrigin}e env=AccessControlAllowOrigin
    Header set Access-Control-Allow-Credentials true
</IfModule>
These can be tested here : https://www.serpworx.com/check-security-headers/
Content Security Policy can be tested before hand by using
Content-Security-Policy-Report-Onlyhttps://www.uriports.com/blog/creating-a-content-security-policy-csp/
More Reading for the new permissions policy header which replaces the Feature Policy header.
https://scotthelme.co.uk/goodbye-feature-policy-and-hello-permissions-policy/
Due to the unprecedented circumstances this year the College had to host their Open Day virtually.
We wanted to have a live feed of heads of departments answering questions which we got during the feed and beforehand. Because we wanted this front and centre we had to look into a way of embedding the feed into our dedicated Open Day webpage.
After looking around online I came across this interesting discussion on embedding Live YouTube Feeds and used it as a basis to create my own class.
https://stackoverflow.com/questions/44354421/how-to-embed-youtube-live-chat-with-url-permanent
<?php
/*****************************************************************
	Class : LIVE EVENT SCHEDULER

	This class handles the live event schedule and loads the
	youtube live feed if an event is due.

	FUNCTIONS
	---------------------------------------------------------
	1. showAll()
		show all scheduled events as cards below the main feed
	2. getNextEvent()
		get an array of the next event's details
	3. showAllUpcoming()
		display a mini feed of all the upcoming events.
	4. showAllPast()
	5. getLiveChatURL()
	6. getLiveVideoID($channelId)
	7. fetchVideoFeeds()

*****************************************************************/
class Schedule {

	public $schedule = array(
	    array(
			'datetime'	=> '202006121100',
			'show'		=> false, // show in main schedule
			'subject'	=> 'Welcome Message',
			'speaker'	=> 'Principal & Vice Principal ',
			'img'		=> '',
			'vid'		=> '',
			'desc'		=> 'Welcome message from the Principal.',
			'link'		=> array(
						array(	'link' => '', 						'text' => 'Find out more' )),
		),

	);

	// Properties
	public $date;
	public $time;
	public $speaker;
	public $subject;

	function __construct() {

	}

	/****************************************
	show all upcoming scheduled items.
	These appear as cards below the main feed.

	@RETURNS
	$html (string) 	: Compiled HTML

	****************************************/
	public function showAll() {

                // Display code goes here.....

		return $html;
	}

	/*********************************************

		Get the next event
		This was used to help calculate when the next event was.

		@RETURNS
		$return (array)	: The event array that is next up.

	*********************************************/
	public function getNextEvent() {
		$now 	= date_create(); // get current date and time.
		$compare 	= date_format($now,"YmdHis"); // formatted current date and time to use as a comparison
		$return 	= $this->schedule[0]; // The event array that is next up. (default as first)

		// loop through events and compare with formatted date.
		foreach($this->schedule as $event) {

			if($compare < $event['datetime'].'00') {
				$return = $event;
				break;
			}
		}

		return $return;
	}

	/***************************************************
		Show all upcoming events as a mini feed

		@RETURNS
		$html (string) : Container for the compiled HTML
	***************************************************/
	public function showAllUpcoming() {

		// Display code goes here ....

		return $html;
	}

	/***********************************************
		Show all past events
		added so that past videos could be viewed.

		@RETURNS
		$html (string) : Compiled HTML of past events.

	***********************************************/
	public function showAllPast() {
		// Display Code goes here....

		return $html;
	}

	/********************************************
		Fetch Live Chat URL from YouTube Channel
		This requires a YouTube Channel ID.

		It will try to fetch the current live video feed ID
		present on that Youtube Channel.
		If it can't find any Live Feeds will return an error.
		If it can the live chat feed url is returned.
	*********************************************/
	public function getLiveChatURL() {

		try {
		    $livevideoId = $this->getLiveVideoID('<< REPLACE WITH CHANNEL ID >>');

		    // Output the Chat URL
		    //echo "The Chat URL is https://www.youtube.com/live_chat?v=".$livevideoId;
		    return array( true, "https://www.youtube.com/live_chat?v=".$livevideoId);
		} catch(Exception $e) {


		    // Echo the generated error
		    return array( false, "1. ERROR: ".$e->getMessage());
		}
	}

	// The method which finds the video ID
	public function getLiveVideoID($channelId)
	{
	    $livevideoId = null;

	    // Fetch the livestream page
	    if($data = file_get_contents('https://www.youtube.com/embed/live_stream?channel='.$channelId))
	    {
	        // Find the video ID in there
	        if(preg_match('/\'VIDEO_ID\': \"(.*?)\"/', $data, $matches))
	            $videoId = $matches[1];
	        else
	            throw new Exception('2. Couldn\'t find video ID');
	    }
	    else
	        throw new Exception('3. Couldn\'t fetch data');

	    return $videoId;
	}

	// AJax function.
	public function fetchVideoFeeds() {
		$html = '';
		$result = $this->getLiveChatURL();

		$html .= '<div class="col-xs-12 col-lg-8">';
					//$html .= '<pre>Dev Note : We are testing the live stream right now</pre><iframe style="width: 100%; height: 411px;" src="https://www.youtube.com/embed/live_stream?channel=CHANNEL_ID_HERE&autoplay=1&rel=0&showinfo=0&cc_load_policy=1" frameborder="0" allow="accelerometer; autoplay; encrypted-media; gyroscope; picture-in-picture" allowfullscreen autoplay></iframe>';

					if($result[0] == true) {
						$html .= '<iframe title="VIDEO FEED TITLE" aria-label="VIDEO ARIA LABEL" style="width: 100%; height: 411px;" src="https://www.youtube.com/embed/live_stream?channel=CHANNEL_ID_HERE&autoplay=1&rel=0&showinfo=0&cc_load_policy=1" frameborder="0" allow="accelerometer; autoplay; encrypted-media; gyroscope; picture-in-picture" allowfullscreen autoplay></iframe>';
					} else {
						$html .= '<iframe title="VIDEO TITLE" aria-label="VIDEO ARIA LABEL" style="width: 100%; height: 411px;" src="https://www.youtube-nocookie.com/embed/ZvzgjA5hhdo?rel=0&autoplay=0&rel=0&showinfo=0&cc_load_policy=1" frameborder="0" allow="accelerometer; autoplay; encrypted-media; gyroscope; picture-in-picture" allowfullscreen></iframe>';
					}
				$html .= '</div>
				<div class="col-xs-12 col-lg-4">';

					if($result[0] == true) {
						$html .= '<iframe src="'.$result[1].'&embed_domain=www.YOURDOMAIN.ac.uk" style="width: 100%; height: 411px" frameborder="0"></iframe>';
					} else {
						$html .= '<div class="nofeed">';
							$html .= '<h2 class="arrow">Upcoming Events </h2>';
							$nextEvent = $this->getNextEvent();
							$datetime = date_create($nextEvent['datetime']);
							$today = date_create();
							$dateDiff = date_diff($today,$datetime);

							$html .= '<div class="content">';
								$html .= '<div class="countdown">';
									$html .= '<div style="display: none;">'.($dateDiff->d > 0 ? $dateDiff->d.'d ' : '').(($dateDiff->d > 0 || $dateDiff->h) > 0 ? $dateDiff->h.'h ' : ''). (($dateDiff->h || $dateDiff->i > 0) ? $dateDiff->i.'m ' : '').$dateDiff->s.'s</div>';
									$html .= '<h6>The next event will be in <time class="counter" datetime="'.date_format($datetime,'Y-m-d\TH:i:s\Z').'" data-now="'.date_format($today, 'Y-m-d\TH:i:s\Z').'">'.($dateDiff->d > 0 ? $dateDiff->d.'d ' : '').(($dateDiff->d > 0 || $dateDiff->h) > 0 ? $dateDiff->h.'h ' : ''). (($dateDiff->h || $dateDiff->i > 0) ? $dateDiff->i.'m ' : '').$dateDiff->s.'s</time></h6>';
									$html .= $this->showAllUpcoming();

								$html .= '</div>';

							$html .= '</div>';
						$html .= '</div>';
					}
				$html .= '</div>';

		return $html;
	}
}

// init
$schedule = new Schedule();
?>
(I’ve taken out some of the irrelevant display bits).
For this example I have the schedule as an array but really it would be better to use a database and add some fetch from database functions to the class.
These functions just displayed all the upcoming events below the feed and aren’t important for this post.
We had a little countdown running on the page to the next event this function was just to help with that countdown and not important for this post.
This function tries to fetch the Live Chat url if it fails it will return an error message.
$livevideoId = $this->getLiveVideoID('PASTE CHANNEL URL HERE');To get the Live Chat URL we also need the Live Video ID. This is fetched via the next function getLiveVideoID() . It requires the Channel ID to get this.
It’s actually fairly straightforward to get the Channel ID. You can either get this from your channel settings or you can simply go to your channel and the ID will display at the end of your URL.

Please note there are a few requirements regarding embedding Live Video Feeds.
return array( true, "https://www.youtube.com/live_chat?v=".$livevideoId);The Live Chat Feed for any Live Video will follow the above format. Of course this might change in the future with YouTube updates but this works at time of writing.
/********************************************
		Fetch Live Chat URL from YouTube Channel
		This requires a YouTube Channel ID.

		It will try to fetch the current live video feed ID
		present on that Youtube Channel.
		If it can't find any Live Feeds will return an error.
		If it can the live chat feed url is returned.
	*********************************************/
	public function getLiveChatURL() {

		try {
		    $livevideoId = $this->getLiveVideoID('PASTE CHANNEL ID HERE');

		    // Output the Chat URL
		    //echo "The Chat URL is https://www.youtube.com/live_chat?v=".$livevideoId;
		    return array( true, "https://www.youtube.com/live_chat?v=".$livevideoId);
		} catch(Exception $e) {


		    // Echo the generated error
		    return array( false, "1. ERROR: ".$e->getMessage());
		}
}This function gets the ID of the Live Video using the provided Channel ID.
if($data = file_get_contents('https://www.youtube.com/embed/live_stream?channel='.$channelId))Currently the Stream url will follow the above format. Of course this might change in the future with YouTube updated but this works at time of writing.
if(preg_match('/\'VIDEO_ID\': \"(.*?)\"/', $data, $matches))
	$videoId = $matches[1];
else
	 throw new Exception('2. Couldn\'t find video ID');
The script then searches the returned file contents for the ‘VIDEO_ID’ variable which is printed in the javaScript on that url.
^ There may be another way of doing this via YouTube’s Javascript Api but this does work.
// The method which finds the video ID
	public function getLiveVideoID($channelId)
	{
	    $livevideoId = null;

	    // Fetch the livestream page
	    if($data = file_get_contents('https://www.youtube.com/embed/live_stream?channel='.$channelId))
	    {
	        // Find the video ID in there
	        if(preg_match('/\'VIDEO_ID\': \"(.*?)\"/', $data, $matches))
	            $videoId = $matches[1];
	        else
	            throw new Exception('2. Couldn\'t find video ID');
	    }
	    else
	        throw new Exception('3. Couldn\'t fetch data');

	    return $videoId;
}Finally I added a function to display the final feed or schedule if there was no live feed. This can also be requested via Ajax to update the feed automatically once the countdown has been reached.
$result = $this->getLiveChatURL();First, this function gets the current Live Chat result from the above function. If there’s no result from this e.g. an error the script instead shows an advert for the college and a schedule of upcoming Live Events.

If there is a result the script replaces the video advert with the live feed…
if($result[0] == true) {
	$html .= '<iframe title="VIDEO TITLE HERE" aria-label="VIDEO ARIA LABEL" style="width: 100%; height: 411px;" src="https://www.youtube.com/embed/live_stream?channel=CHANNEL_ID_HERE&autoplay=1&rel=0&showinfo=0&cc_load_policy=1" frameborder="0" allow="accelerometer; autoplay; encrypted-media; gyroscope; picture-in-picture" allowfullscreen autoplay></iframe>';
}
Note : I should probably update this so that the Live Stream url is inserted by the schedule class.
if($result[0] == true) {
	$html .= '<iframe src="'.$result[1].'&embed_domain=www.dumgal.ac.uk" style="width: 100%; height: 411px" frameborder="0"></iframe>';
}
It also adds in the Live Chat embed. Note the &embed_domain variable. This should be set to your websites url otherwise the video will not show.
$nextEvent = $this->getNextEvent();
							$datetime = date_create($nextEvent['datetime']);
							$today = date_create();
							$dateDiff = date_diff($today,$datetime);

							$html .= '<div class="content">';
								$html .= '<div class="countdown">';
									$html .= '<div style="display: none;">'.($dateDiff->d > 0 ? $dateDiff->d.'d ' : '').(($dateDiff->d > 0 || $dateDiff->h) > 0 ? $dateDiff->h.'h ' : ''). (($dateDiff->h || $dateDiff->i > 0) ? $dateDiff->i.'m ' : '').$dateDiff->s.'s</div>';
									$html .= '<h6>The next event will be in <time class="counter" datetime="'.date_format($datetime,'Y-m-d\TH:i:s\Z').'" data-now="'.date_format($today, 'Y-m-d\TH:i:s\Z').'">'.($dateDiff->d > 0 ? $dateDiff->d.'d ' : '').(($dateDiff->d > 0 || $dateDiff->h) > 0 ? $dateDiff->h.'h ' : ''). (($dateDiff->h || $dateDiff->i > 0) ? $dateDiff->i.'m ' : '').$dateDiff->s.'s</time></h6>';

									$html .= $this->showAllUpcoming();
I also added in a little countdown which is updated by javaScript.
All this html is then returned by the function.
// init
$schedule = new Schedule();
Final part of the class.php file it creates a new instance of the class.
On the open day page where the feed is to be displayed I included the new class file.
<?php

// Include the Event Scheduler Class. (handles the schedules and live video links)
include('classes/class_schedule.php');

?>
And added in an area for the Live Feed to go…
<!-- LIVE VIDEO FEEDS & CHAT -->
<a class="pastevents" href="#eventspast" title="View Past Events" aria-label="View Past Events">Watch Past Events</a>
<div id="videofeed" class="row videofeeds">
	<?php echo $schedule->fetchVideoFeeds(); ?>
</div>
<!-- END OF LIVE VIDEO FEEDS AND CHAT -->I also added in a little bit of javaScript that updates the countdown and reloads the feed area once the countdown hits 0.
jQuery(document).ready( function($) {

	// Set the date we're counting down to
	var nextEventDate = $('.counter').attr('datetime');
	var today = $('.counter').data('now');
	var countDownDate = new Date(nextEventDate).getTime();

	// Update the count down every 1 second
	var x = setInterval(function() {

	  // Get today's date and time
	  var today = new Date();
	  // DST
	  today.setHours(today.getHours() + 1);

	  var now = today.getTime();

	  // Find the distance between now and the count down date
	  var distance = countDownDate - now;

	  // Time calculations for days, hours, minutes and seconds
	  var days = Math.floor(distance / (1000 * 60 * 60 * 24));
	  var hours = Math.floor((distance % (1000 * 60 * 60 * 24)) / (1000 * 60 * 60));
	  var minutes = Math.floor((distance % (1000 * 60 * 60)) / (1000 * 60));
	  var seconds = Math.floor((distance % (1000 * 60)) / 1000);

	  // Display the result in the element with id="demo"
	  $('.counter').html((days > 0 ? days + "d " : '') + ((days > 0 || hours > 0) ? hours + "h " : '') + ((hours > 0 || minutes > 0) ? minutes + "m " : '') + seconds + "s ");

	  // If the count down is finished, write some text
	  if (distance < 0) {
	    clearInterval(x);
	    $('.counter').html('Now....reloading in <span class="reloadcount">3</span>');

		// fetch the feed...
		$.get("fetch.php", function(data, status){
			$('.videofeeds').html(data); //.animate({'opacity' : '1'}); // fade back in.
		});
	  }
	}, 1000);    //testing

});There is roughly a minute delay between when you start your Live Feed and it appearing on YouTube so it’s a good idea to have a buffer time and start the Live Feed before the event is scheduled. This also mitigates any issues with server times being slightly out of sync.
We had a 15 minute buffer period before each event.
The fetch.php file just includes the schedule class and echos out the feed.
<?php
// Include the Event Scheduler Class. (handles the schedules and live video links)
include('classes/class_schedule.php');

echo $schedule->fetchVideoFeeds();

?>A few interesting articles on UX design I want to read later.
https://uxdesign.cc/breadcrumbs-for-desktop-ux-design-youre-doing-them-wrong-70fe62e6180e
https://usabilitygeek.com/ui-patterns-for-navigation-good-ux/
https://usabilitygeek.com/ux-design-tips-best-footer/
https://uxplanet.org/is-your-footer-at-an-optimal-user-experience-level-cccb6f388614
A recent project I’m working on had an image where a series of colours were laid out like sun rays behind some figures. I was curious if I could do these blocks of colour with CSS. I came across conic-gradients and I’ve been experimenting with it to see what I can do with it.
.rays {
  background: -webkit-repeating-conic-gradient(from 270deg at 50% 120%, #FFA500 0deg 10deg, #ff6700 10deg 20deg);
  background: -moz-repeating-conic-gradient(from 270deg at 50% 120%, #FFA500 0deg 10deg, #ff6700 10deg 20deg);
  background: repeating-conic-gradient(from 270deg at 50% 120%, #FFA500 0deg 10deg, #ff6700 10deg 20deg);
}
Note : Firefox does not currently support repeating-conic-gradients 🙁
background: conic-gradient(from 270deg at 50% 100%,#f3d8e6 0 36deg,#F8DCC4 0 72deg,#CAD9B9 0 108deg, #9FC0CC 0 144deg, #BEC5D9 0 180deg, #ffffff 0 100%); I’ve been working on setting up some search engine friendly urls on a PHP website.
Rather than have urls that look like www.domain.co.uk/index.php?id=23 I wanted to change them to look like www.domain.co.uk/slugname like WordPress does.
To do this I used .htaccess
RewriteEngine On
RewriteRule ^\/?services\/? index.php?cat=2 [NC]
RewriteRule ^\/?departments\/? index.php?cat=3 [NC]
RewriteRule ^\/?resources\/? index.php?cat=4 [NC]
RewriteRule ^\/?calendar\/? index.php?cat=5 [NC]
RewriteRule ^\/?college\/([a-z0-9\-\_]+)\/?$ index.php?cat=1&id=$1 [NC]
RewriteRule ^\/?college\/? index.php?cat=1 [NC]
Ref : https://httpd.apache.org/docs/current/mod/mod_rewrite.html
RewriteEngine OnEnabled the Apache Mod_Rewrite
This lets me rewrite urls.
RewriteRule ^\/?services\/? index.php?cat=2 [NC]This line is a rewrite rule
( https://httpd.apache.org/docs/current/mod/mod_rewrite.html#rewriterule )
After the rule is defined the next part looks for a matching pattern in the current url using regex.
(Ref : https://www.rexegg.com/regex-quickstart.html )
^ – Start of the string matches the following…
\ – escapes reserved characters
/? – may or may not have a / at the start
services – followed by the string ‘services’
\ – escaped reserved characters
/? – may or may not end with a trailing /
Then the actual path is specified (this is the path that will actually load)
[NC] indicates that the rewrite rule is case insensitive (therefore it will match regardless of characters being uppercase or lowercase)
RewriteRule ^\/?college\/([a-z0-9\-\_]+)\/?$ index.php?cat=1&id=$1 [NC]I added a rewrite rule to handle sub items. This one takes an id from the pattern and adds it to the actual path. so if you typed in www.domain.com/college/item it would load www.domain.com/index.php?cat=1&id=item .
^\/?college\/([a-z0-9\-\_]+)\/?$^ – match the start of the string
/? – may or may not start with a /
college/ – followed by the string college/
([a-z0-9\-\_]+) – followed by a group of characters in the set [ ] ( a-z 0-9 – or _ ) case doesn’t matter in this example because we are using NC at the end.
\ – escape string (escapes the slash)
/? – may or may not end with a /
$ – matches the end of the string specified in the brackets ( )
index.php?cat=1&id=$1The matched string ( (…)$ ) is then inserted into the actual path using $1 – if you matched more than one param from the first string your would number them $1, $2, $3 e.t.c.
This is a fairly basic example, it works for what I need but I may take it further in the future…
I’ve modified my SCSS Breakpoints Shell Script a tiny bit to now add @import <<viewport size>> for each of the module viewport breakpoints to my main theme.scss file. I’ve set this up to work with my own setup, but if it’s useful to anyone else I’ve added it to github.
I wrote a couple of Shell Scripts to save time when splitting SCSS into breakpoint files.
https://github.com/dgrumbler/useful_shell_scripts
$ sh sassBreakpoints.shThis creates a named folder based on the name of the module you type in.
It then creates all the breakpoints :
Then for each breakpoint it adds the following:
/****************************************************************
	Theme: << Module Name >>
	Viewport: << Viewport Size >>
	Author: << Author >>
****************************************************************/
Replacing Module name, viewport size and author with the user input and filename.
e.g.
/****************************************************************
	Theme: Carousel
	Viewport: 768 up
	Author: Rebecca Rumble
****************************************************************/
This one does the same as the above except it doesn’t create a folder and runs in the current directory.
$ sh sassBreakpointsNoFolder.shFor future reference a basic SASS compiler using gulp.
Requirements:
$ [sudo] npm install gulp -gThe sudo command is optional but I needed it to install.
$ mkdir base-flat-html
$ cd base-flat-html/

$ npm init

$ mkdir sass
$ mkdir css
$ touch sass/theme.scss
This creates a directory,
changes to the new directory.
Initialises NPM in the directory which guides you through creating a package.json file.
Creates a folder called sass. This will contain all the SASS files.
Creates a folder called css. This will contain all the compiled CSS files.
Creates a file called theme.scss in the sass directory.
$ npm install gulp --save-devInstall Gulp to the directory. This will update your package.json file.
$ npm install gulp-sass --save-dev
$ npm install gulp-cssnano --save-dev
$ npm install gulp-rename --save-dev
$ npm install gulp-wait --save-dev
These lines install:
Create a new file called gulpfile.js this will contain all the tasks we want gulp to run.
$ touch gulpfile.jsFirst add gulp and all the required gulp modules we installed.
var gulp = require('gulp');
var sass = require('gulp-sass');
var cssnano = require('gulp-cssnano');
var rename = require('gulp-rename');
var wait = require('gulp-wait');
Then setup a task for compiling the SASS files
gulp.task('sass', function() {
	return gulp.src('sass/theme.scss')
		.pipe(wait(1500))
		.pipe(sass())
		.pipe(gulp.dest('css'))
});
This task takes the SASS file theme.scss and then waits 1500ms before running the compiler and then saving it to the css folder.
Next I create a task for minifying the compiled CSS.
gulp.task('minicss', function() {
	return gulp.src('css/theme.css')
		.pipe(cssnano())
		.pipe(rename({
			suffix: '.min'
		}))
		.pipe(gulp.dest('css'))
});
This takes the compiled theme.css file and minifies it. Then it creates a renamed copy with .min in the filename and saves it to the css directory.
Finally I add a watch task so that these two tasks will run whenever a change is made to the SASS files.
gulp.task('watch', function() {
	gulp.watch('sass/**/*.scss', gulp.series('sass','minicss', function(done) {
		done();
	}));
});
This watches the sass folder and runs the two tasks in sequence whenever a sass file is changed.
Full Code is here : https://github.com/dgrumbler/base-flat-html
To install run:
$ npm init
$ npm install