Breadcrumbs CSS
Breadcrumb Styling example I wrote.
I need to double check browser support. Add a fallback for IE 11 and add mobile support.
Breadcrumb Styling example I wrote.
I need to double check browser support. Add a fallback for IE 11 and add mobile support.
A few interesting articles on UX design I want to read later.
https://uxdesign.cc/breadcrumbs-for-desktop-ux-design-youre-doing-them-wrong-70fe62e6180e
https://usabilitygeek.com/ui-patterns-for-navigation-good-ux/
https://usabilitygeek.com/ux-design-tips-best-footer/
https://uxplanet.org/is-your-footer-at-an-optimal-user-experience-level-cccb6f388614
A recent project I’m working on had an image where a series of colours were laid out like sun rays behind some figures. I was curious if I could do these blocks of colour with CSS. I came across conic-gradients and I’ve been experimenting with it to see what I can do with it.
.rays {
  background: -webkit-repeating-conic-gradient(from 270deg at 50% 120%, #FFA500 0deg 10deg, #ff6700 10deg 20deg);
  background: -moz-repeating-conic-gradient(from 270deg at 50% 120%, #FFA500 0deg 10deg, #ff6700 10deg 20deg);
  background: repeating-conic-gradient(from 270deg at 50% 120%, #FFA500 0deg 10deg, #ff6700 10deg 20deg);
}
Note : Firefox does not currently support repeating-conic-gradients 🙁
background: conic-gradient(from 270deg at 50% 100%,#f3d8e6 0 36deg,#F8DCC4 0 72deg,#CAD9B9 0 108deg, #9FC0CC 0 144deg, #BEC5D9 0 180deg, #ffffff 0 100%); Development in Progress
I am currently learning and updating this post as I go along so it may change over the next few weeks 🙂 .
XD has this cool little area for adding in plugins to your install. They can be anything from inserting useful elements like calendars, to testing your content is accessible for those with colourblindness.
Then I suddenly noticed a little tab called “Development” under plugins:
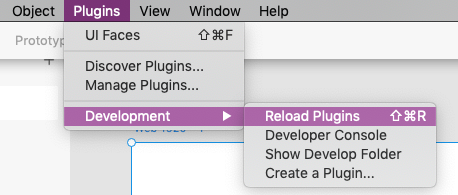
So as a challenge I’ve decided to have a go at making my own plugin for XD and make a blog post about it.
XD plugins use JSON and JavaScript – so not too much of a leap!
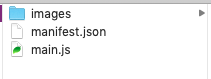
A basic XD plugin consists of a manifest.json file and a main.js file. You can also add images and other files but those two files are all that is really needed.
There is also a Quick Start Tutorial for setting up with React (I don’t see much point in reposting their steps 🙂 )
mkdir xdpluginreact
cd xdpluginreact
npm init -y
npm install webpack webpack-cli --save-dev
I also then split the files so there was a distribution folder as I don’t want to include development files in the final version that gets moved to Adobe XD.
I’ve documented that in this post here. Following those steps you end up with:
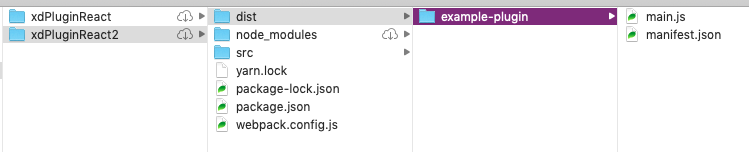
Once the plugin is finished it is the example-plugin folder that is copied into the Adobe XD develop folder.
Finally I can update the package.json file.
Note : “private”: true means that it can’t be published by accident 🙂
XD Brand / Design Guidelines can be found here : https://github.com/AdobeXD/plugin-design-assets/
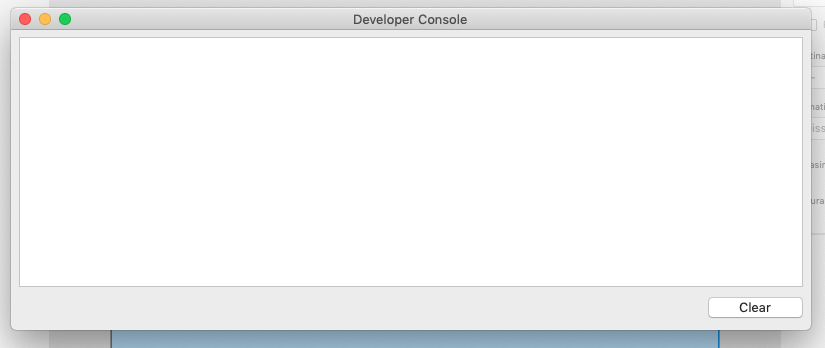
There is a console you can use for catching error messages.
Go to Plugins -> Development -> Developer Console
I generally learn more when I’m trying to do something. So now I’ve got the Quick Start Tutorial working and gone through some of the introduction tutorials + the Quick Start React Tutorial. I’m going to set myself a simple task to learn more.
I’m going to create a Lorem Ipsum generator (I know these already exist but I thought I would start with something that appeared to be simple then expand on it. Plus once I’ve got it working I can try bringing in some more fun Lorem Ipsum Generators rather than the boring standard one).
Challenge Requirements
I followed the Quick Start Panel UI tutorial to setup the new plugin.
I modified the manifest.json to include my own information and to change the entry point information.
    "uiEntryPoints": [
        {
            "type": "panel",
            "label": "Insert Lorem Ipsum",
            "panelId": "insertLoremIpsum"
        }
    ]
I then changed the first line of the main.js to include the text scenegraph element.
const { Rectangle, Text, Color } = require("scenegraph");I replaced the “enlargeRectangle” function in the create function with my own function called “replaceWithLoremIpsum”
 function replaceWithLoremIpsum() {
    const { editDocument } = require("application"); // [3]
    let coords;

    // Edit the Document...
    editDocument({ editLabel: "Insert Lorem Ipsum." }, function(selection) {

        // Currently Selected Rectangle.
        const selectedRectangle = selection.items[0]; // [7]

        // Get the Rectangle's Coordinates.
        coords = selectedRectangle.boundsInParent;

        // Create a new Text Node
        const node = new Text();

        // Text Settings
        node.text = "Lorem Ipsum will go here...";
        node.fill = new Color("#1f1f1f");
        node.fontSize = 50;

        // Match the selected Rectangles area and location.
        node.areaBox = {width: coords.width, height: coords.height};
        node.translation = {x: coords.x, y: coords.y };

        // add the new text box.
        selection.insertionParent.addChild(node);

        // Hide the selected rectangle (keeping it in case the user still needs it.
        selectedRectangle.visible = false;

    });
  }
This function takes the currently selected rectangle,
records the coordinates and dimensions of the rectangle,
creates a new Text node,
Adds some text to the new text node,
Sets some text settings,
Changes the Text node to a fixed width and height that matches the selected rectangle (otherwise it just sets an auto height & width),
Moves the Text area to the same coordinates as the selected rectangle,
Add the new text node to the artboard,
Hides the selected rectangle from the user view.
I decided to keep the rectangle rather than removing it incase the user still needs it. They can always delete it if they prefer.
I then updated the querySelector to use my new function rather than the enlargeRectangle function.
panel.querySelector("form").addEventListener("submit", replaceWithLoremIpsum); // [11]I also updated the module.exports to match the manifest.json file.
module.exports = {
  panels: {
    insertLoremIpsum: {
      show,
      update
    }
  }
};I want to store the sample text seperately from the code. This is partly to keep the code a bit neater.
I’m using the file reading tutorial as a guide : https://adobexdplatform.com/plugin-docs/tutorials/how-to-read-a-file/
and the File reference : https://adobexdplatform.com/plugin-docs/reference/uxp/storage-index.html
and the documentation about using require to include other files : https://adobexdplatform.com/plugin-docs/reference/javascript/javascript-support.html#can-i-use-require
I’ve created a text folder in the plugin directory with a file called latin.json that has the Lorem Ipsum reference text in it.
{
    "content" : "Lorem ipsum dolor sit amet, conse",
}
I added a variable near the top to act as a container for the selected lorem ipsum.
let textToAdd = "Lorem Ipsum will go here..."; // Container for the Lorem Ipsum text to add...I added a new function to the create function to handle the generation of the Lorem Ipsum text. I’ve written it in this way as I’m intending to expand on it later.
/**************************************************************
FUNCTION TO FETCH LOREM IPSUM
**************************************************************/
function fetchLoremIpsum() {

	const noScentences = 7;	// Total number of scentences to include in a paragraph
	const noParagraphs = 2;	// Total number of paragraphs to include

	// Fetch the lorem ipsum.
	const latin = require("./text/latin.json");

	// Split text into scentences
	let scentences = latin.content.split('.');

	// Clear any existing text
	textToAdd = '';

	// keep adding scentences so long as we have enough scentences per paragraph.
	for(let i = 0; i < (noScentences * noParagraphs); i++) {
		textToAdd += scentences[i]+'.';

		// if we've reached the total number of scentences per paragraph
		if(i > 0 && (i % noScentences) === 0) {
			textToAdd += '\n';	// add a line break.
		}
	}

}
Then I change the new text node to use the textToAdd variable rather than a set string.
node.text = textToAdd;I initially wasn’t sure if this would be possible but I thought there probably would be a way to select existing nodes in the document without the user indicating one.
I had a look through the tutorials and felt that the tutorial on changing the colours of rectangles would probably give me some clues on what to do ->
https://adobexdplatform.com/plugin-docs/tutorials/how-to-work-with-scenenodelist/.
I added a new container variable for the last submitted text node settings at the top of main.js
let lastSubmittedText; // Container for Last Submitted Text NodeI then created a new function in the create function called findTextSettings.
    /**************************************************************
        FUNCTION TO FIND PREVIOUS TEXT SETTINGS
        Parameters that are passed down are Contextual Arguments
        ( https://adobexdplatform.com/plugin-docs/reference/structure/handlers.html#contextual-arguments )
    **************************************************************/
    function findTextSettings(selection, documentRoot) {

        // for each node in the document....
        documentRoot.children.forEach(node => {

            // Check if node is a child of Artboard
            if(node instanceof Artboard) {
                let artboard = node;

                // Filter out the child nodes that are Text nodes and set as text
                let text = artboard.children.filter(artboardChild => {
                    return artboardChild instanceof Text;
                });

                let lastText = text[(text.length - 1)];

                // Set last submitted Text settings.
                lastSubmittedText = {
                    fill : lastText.fill,
                    fontSize : lastText.fontSize
                };

            }

        });

    }
I modified the example function for selecting rectangles in the artboard to select text nodes instead and to update the container variable with the new data.
Note about Contextual Arguments:
https://adobexdplatform.com/plugin-docs/reference/structure/handlers.html#contextual-arguments
The documentRoot parameter needs to be added to the editDcoument function for this to be passed down.
// Edit the Document...
editDocument({ editLabel: "Insert Lorem Ipsum." }, function(selection,documentRoot) {

   findTextSettings(selection, documentRoot);
   // ....

}
I also added a call to update the last submitted text node.
I then modified the text settings of the new text mode to use the last submitted settings if they exist:
// Text Settings
node.text = textToAdd;
node.fill = new Color((typeof lastSubmittedText !== 'undefined'  ? lastSubmittedText.fill : "#1f1f1f"));
node.fontSize = (typeof lastSubmittedText !== 'undefined' ? lastSubmittedText.fontSize : 16);
There are more settings than this so I am now going through and adding all the rest of the settings.
Although fetching the last selected settings is useful as a fallback, I think the user should be able to change the text settings before they import the Lorem Ipsum.
This means adding in some inputs to the main form.
I would like to add a list of system fonts to choose from as well but after some research it appears this is not currently possible. But it is something they may add in this year so I will revisit once it is possible : https://forums.adobexdplatform.com/t/api-to-list-which-fonts-are-available-detect-if-text-has-missing-font/629/4
This is probably the case with fontStyles as well but I’ll add a couple of common ones to the list to choose from.
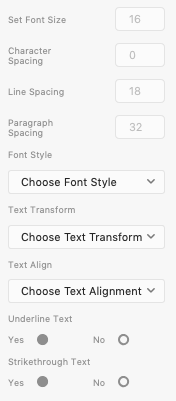
Once I had modified the form to include the new options I then modified the find TextSettings() function to fetch the user settings.
const userFontSize = Number(document.querySelector("#setFontSize").value);
const userCharSpacing = Number(document.querySelector("#setCharSpacing").value);
const userLineSpacing = Number(document.querySelector("#setLineSpacing").value);
const userParaSpacing = Number(document.querySelector("#setParaSpacing").value);

const userFontStyle = String(document.querySelector("#setFontStyle").value);
const userTextTransform = String(document.querySelector("#setTextTransform").value);
const userTextAlign = String(document.querySelector("#setTextAlign").value);

const userUnderline = Boolean(document.querySelector("input[name='setUnderline']").value);
const userStrike = Boolean(document.querySelector("input[name='setStrike']").value);
Then it was just a case of checking the values and overriding the text settings where the user had set something:
if(userFontSize != '') {
    lastSubmittedText.fontSize = userFontSize;
}
if(userCharSpacing != '') {
    lastSubmittedText.charSpacing = userCharSpacing;
}
if(userLineSpacing != '') {
    lastSubmittedText.lineSpacing = userLineSpacing;
}
if(userParaSpacing != '') {
    lastSubmittedText.paragraphSpacing = userParaSpacing;
}

if(userFontStyle != '' && userFontStyle != 'Choose Font Style') {
    lastSubmittedText.fontStyle = userFontStyle;
}
if(userTextTransform != '' && userTextTransform != 'Choose Text Transform') {
    lastSubmittedText.textTransform = userTextTransform;
}
if(userTextAlign != '' && userTextAlign != 'Choose Text Alignment') {
    lastSubmittedText.textAlign = userTextAlign;
}

if(typeof userUnderline !== "undefined") {
    lastSubmittedText.underline = userUnderline;
}
if(typeof userStrike !== "undefined") {
    lastSubmittedText.strikethrough = userStrike;
}“missing a name for object member”
Check there isn’t a comma at the end of the JSON (oops)
“Command “JSX” Not Found”
$ sudo npm install -g jsx“Plugin TypeError: Assignment to constant variable.”
If you define a variable as const you cant change its value. To resolve it just define it by let and try. (oops).
more to follow….
https://adobexdplatform.com/plugin-docs/
https://adobexdplatform.com/plugin-docs/tutorials/quick-start/
https://adobexdplatform.com/plugin-docs/tutorials/
https://github.com/AdobeXD/Plugin-Samples