When coding a Gutenberg block plugin for WordPress and you want to remove some of the <RichText> toolbar options on that block. You can set “withoutInteractiveFormatting” and then list the allowedFormats.
This post is a work in progress and is mainly documentation on things I have discovered / learned while working on a project. There are probably better ways of doing some of this.
Some uploader settings
dropzone : This is the container element where the user will be dropping files. This triggers the drop files here when files are dragged over the element.
container : To confirm
browser : To confirm
error : Error handler e.g. function(e){ }
success : This fires when a file has been uploaded (it fires for each file that has been added).
added : This fires as each file is added to the drop zone (it fires for each file added).
progress : This fires while the file is being uploaded, (it fires for each file that has been added).
complete : I’ve never seen this fire so far so I’m not sure what triggers it.
refresh : I think this fires if the instance is refreshed but I haven’t confirmed.
uploader: {
	dropzone:  $('.dragzone'), // The dropzone container
	container: $('.dragzone'),
	browser:   'browse_button',
	error: function(e) {	// if there is an error during upload this should fire.

		console.log(e);
		console.log('error');

	},
	success: function(e) {	// once a file is uploaded this should fire.

		//console.log(e);
		//console.log('success');

		fileTemplate(e);

		noItemsUp++; 	// update the number of items uploaded.
		prevProgress = Math.floor(progressBar);
		progressBar = Math.floor(percent * noItemsUp);

		animateProgress();

		$('#importFiles').prop('disabled', false);

	},
	added: function(e) {	// this fires when a file is added.

		noItems++; 	// add 1 to the number of items being uploaded
		percent		= 100 / noItems;	// work out the new percentage per item...
		prevProgress 	= progressBar;	// This is needed so the animated counter can work
		progressBar 	= percent * noItemsUp;		// This is the new progress the bar needs to move to.

		animateProgress();

	},
	progress: function(e) {	// this fires while the file is being uploaded.
		//console.log(e);
		//console.log('progress');
	},
	complete: function(e) { // ?
		//console.log(e);
		//console.log('complete');
	},
	refresh: function(e) { // ?
		//console.log(e);
		//console.log('refresh');
	}
}
The task : create a single file upload field on the add / edit page of a custom post type within a WordPress plugin. The file should use the WordPress media library functionality to upload and select the file.
I’ve added some screenshots of the finished field. I’ve added the field into the “Add New Custom Post Type” form using a meta box.
When the “Add the File” button is clicked (or the input field) the WordPress media library modal should appear.
I’ve modified the parameters to change the title of the modal window and the text on the button.
Once a file has been selected and chosen the information in the file preview box is filled out:
The Code
To use the WordPress Media api you need to include the media library scripts so that your custom script can access its functionality. To do this you will need to create a function for “enqueue”-ing scripts to your WordPress admin. Mine is created as part of a class for my plugin:
// Set some constants
defined( 'FMPLUGINURL' ) or define( 'FMPLUGINURL', plugin_dir_url( __FILE__ ) );

class FileManager {

	// Initialise the plugin
	public static function init() {
		add_action('admin_enqueue_scripts',['FileManager','queue_assets']);
	}

	// Add your assets to the admin view.
	public static function queue_assets() {

		// Checks that it's in the admin view
		if(is_admin()) {
			wp_enqueue_media(); // WP Media API
			wp_register_script( 'fm_media_uploader', FMPLUGINURL.'assets/js/fm_media_uploader.js');        // Customised WP media Upload Script for this plugin.
			wp_localize_script( 'fm_media_uploader', 'FMPLUGINURL', FMPLUGINURL );
			wp_enqueue_script('fm_media_uploader');
		}
	}
}

FileManager::init();
The above code adds all the assets necessary for using the media JavaScript API.
The fm_media_uploader file is where I am adding all the custom JavaScript to hook into the media API.
fm_media_uploader.js
First we need to setup an instance of the Media Library Modal which I will be storing in the variable below.
// Set some required variables
var mediaUploader;
We also will need a trigger so that the Media Library Modal will open when certain elements are clicked.
// Set some required variables
var mediaUploader;

// Set the triggers
$('#mediaUpload, .file-field input, .file-options a').on("click", function(e) {

	// This just prevents any default functions from occuring e.g. stops a form from submitting.
	e.preventDefault();

});
The instance of the media uploader will be created once the trigger is clicked.
// Set the media uploader with the following parameters
mediaUploader = wp.media.frames.file_frame = wp.media({
	title: 'Choose File',		// Title at the top of the Modal Window
	button: {						// Button Parameters
		text: 'Choose File',	// Button Text
	},
	multiple: false 			// Allow multiple file uploads?
});
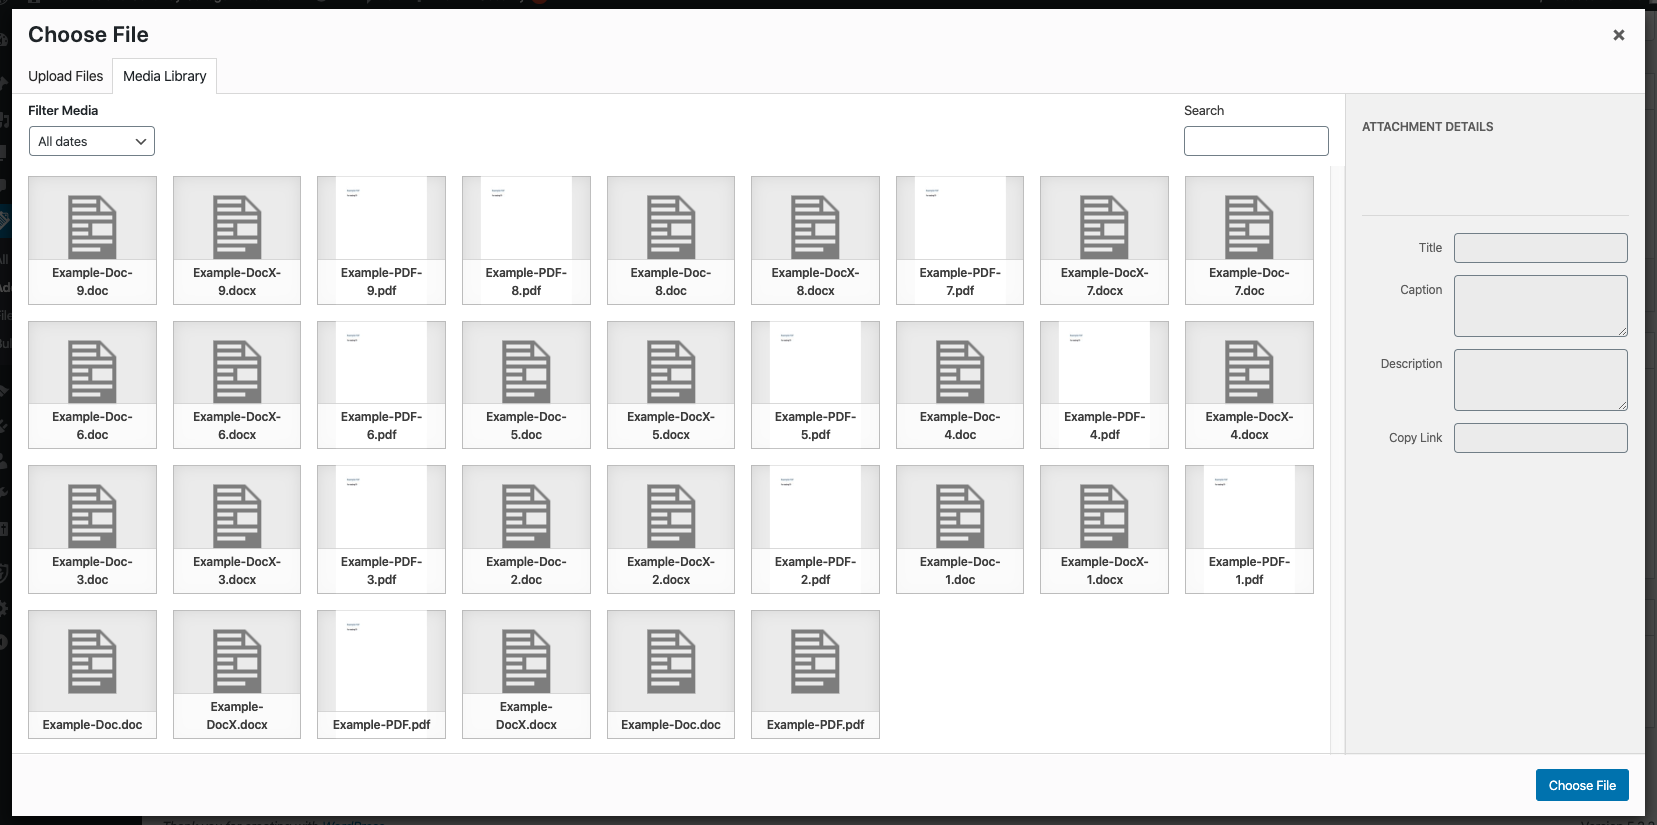
This sets up an instance of the Media Library Modal while modifying the title of the window and the button parameter. There is also an option to upload multiple or single files. There may be more parameters but these are the ones I know about so far. I may add to this post (and my next one) as I learn more.
This is how the modal window will look once triggered.
Finally we will tell the modal window to open:
// open the Media Uploader.
mediaUploader.open();
So once the Add File button is clicked the WordPress Media Library modal window will appear and allow you to select a file. However you may find two problems:
You can’t open the same modal window a second time.
Nothing happens to the file once it is selected.
Prevent Multiple Instances
The reason you might have problems clicking the button a second time is that it is trying to create multiple instances on the same variable. So we need to add some code so the creation part is skipped if the instance has already been created.
if (mediaUploader) {

	// open the media uploader.
	mediaUploader.open();
	return;

}
If an instance of the Media Library Modal already exists it simply opens to existing instance and skips the part tht creates the instance.
I think this part could be cleaner. It is something I’m planning on revisiting later.
Handling the Selected File
The following piece of code handles the selected file and should be added when the instance of the Media Library Modal is created but before it is opened.
I may rewrite this bit in the future, as I think it could be neater.
// When a file is selected in the modal window....
mediaUploader.on('select', function() {

	var attachment = mediaUploader.state().get('selection').first().toJSON(); 	// the selected file is added to the selection list
	var fileDescription = $('textarea[name="FMDescription"]').val(); 		// get current File Description
	var file = attachment.filename.split('.');												// get the filename and split into an array.

	file.reverse();		// reverse the array to make it easier to get the file extension

	$('.file-type').text('.'+file[0]);                                    		// File Extension
	$('input[name="FMFile"]').val(attachment.url);          // File URL
	$('.file-header').text(attachment.title);                         	// File Title

	if(fileDescription == '') {
		$('textarea[name="FMDescription"]').val(attachment.description);
	} // Set File Description if nothing has been filled in yet...

	$('.upload-date').text(attachment.dateFormatted);            // File Upload Date Formatted (this will use WordPress's default setting)
	$('.file-size').text(attachment.filesizeHumanReadable);      // File Size
	$('.file-options .edit').attr('href', attachment.editLink).text('Edit');
	$('input[name="FM_attachment_id"]').val(attachment.id);     // Attachment (file) ID

	var date = $('#jquery-datepicker').val();

	if(date) {
		$('input[name="FMTitle"]').val(attachment.title+' '+date);
	}

});
This may have more code than you need as I’ve taken it from my own project.
First we have an event listener that runs a function when the ‘select’ event is triggered on the Media Library Modal instance.
mediaUploader.on('select', function() { });
Then we need to collect all the details of the file that has been selected. This is returned in JSON format.
var attachment = mediaUploader.state().get('selection').first().toJSON();
The rest of the code is just me telling the script to fill in various fields with the file data to display it like below:
Handling Edit Mode
When the custom post type is reopened in edit mode; it should automatically have the file selected when the file field is clicked. However at present the script won’t let this happen. We need to add some additional code to make this happen.
var fileID = $('input[name="FM_attachment_id"').val();
First we grab the attachment ID (I use a hidden field to store this in the Meta Box).
Then in both the open existing mediaUploader statement and the mediaUploader.on(‘open’, function()) we need to add the following:
if(fileID) {
	// select the file ID to show it as selected in the Media Library Modal.
	mediaUploader.uploader.uploader.param( 'post_id', parseInt(fileID) );
	var selection = mediaUploader.state().get('selection');
	selection.add(wp.media.attachment(fileID));
}
It needs to be added twice because you might try and edit after you’ve added a file or when you are opening an existing custom post type. So it needs to check both in the creation of the instance and when an existing instance is opened.
I’m planning on working on this to try and make it neater and not repeat the same code twice but hey it works for now.
The Full Code
This is the current javaScript code in full…
// Set some required variables
var mediaUploader;

// Set the triggers
$('#mediaUpload, .file-field input, .file-options a').on("click", function(e) {

	// This just prevents any default functions from occuring e.g. stops a form from submitting.
	e.preventDefault();

	// Fetch the value of the currently selected File - if nothing has been selected this will be empty
	var fileID = $('input[name="FM_attachment_id"').val();

	// If there is already a Media Library Modal only this block will run as it doesn't need to be initialised again.
	if (mediaUploader) {

		// This should only be run if a file has already been selected
		if(fileID) {

			// when the media library modal is opened....
			mediaUploader.on('open', function() {

				// if there's a file ID
				if(fileID) {
					// select the file ID to show it as selected in the Media Library Modal.
					mediaUploader.uploader.uploader.param( 'post_id', parseInt(fileID) );
					var selection = mediaUploader.state().get('selection');
					selection.add(wp.media.attachment(fileID));
				}
			});

		}

		// open the media uploader.
		mediaUploader.open();
		return;

	}

	// Set the media uploader with the followign parameters
	mediaUploader = wp.media.frames.file_frame = wp.media({
		title: 'Choose File',		// Title at the top of the Modal Window
		button: {						// Button Parameters
			text: 'Choose File',	// Button Text
		},
		multiple: false 			// Allow multiple file uploads?
	});

	// When the Media library Modal is opened...
	mediaUploader.on('open', function() {
		// if there is a file ID...
		if(fileID) {
			// select the file ID to show it as selected in the Media Library Modal.
			mediaUploader.uploader.uploader.param( 'post_id', parseInt(fileID) );
			var selection = mediaUploader.state().get('selection');
			selection.add(wp.media.attachment(fileID));
		}
	});

	// When a file is selected in the modal window....
	mediaUploader.on('select', function() {

		var attachment = mediaUploader.state().get('selection').first().toJSON(); 	// the selected file is added to the selection list
		var fileDescription = $('textarea[name="FMDescription"]').val(); 		// get current File Description
		var file = attachment.filename.split('.');												// get the filename and split into an array.

		file.reverse();		// reverse the array to make it easier to get the file extension

		$('.file-type').text('.'+file[0]);                                    		// File Extension
		$('input[name="FMFile"]').val(attachment.url);          // File URL
		$('.file-header').text(attachment.title);                         	// File Title

		if(fileDescription == '') {
			$('textarea[name="FMDescription"]').val(attachment.description);
		} // Set File Description if nothing has been filled in yet...

		$('.upload-date').text(attachment.dateFormatted);            // File Upload Date Formatted (this will use WordPress's default setting)
		$('.file-size').text(attachment.filesizeHumanReadable);      // File Size
		$('.file-options .edit').attr('href', attachment.editLink).text('Edit');
		$('input[name="FM_attachment_id"]').val(attachment.id);     // Attachment (file) ID

		var date = $('#jquery-datepicker').val();

		if(date) {
			$('input[name="FMTitle"]').val(attachment.title+' '+date);
		}

	});

	// open the Media Uploader.
	mediaUploader.open();

});
Meta Box HTML
For reference this is the meta box HTML, it is also part of a PHP class.
I came across this odd bug. This only occurs if you try to upload a file before selecting a file. However if you select a file, then go back and try and upload a file it then works?
If I added the following to the mediaUploader it worked as it should, however this had the effect of losing the title option. I believe the title and button options only work on a custom frame.