I am currently learning and updating this post as I go along so it may change over the next few weeks 🙂 .
XD has this cool little area for adding in plugins to your install. They can be anything from inserting useful elements like calendars, to testing your content is accessible for those with colourblindness.
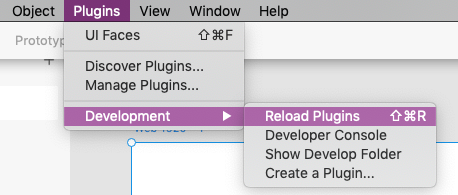
Then I suddenly noticed a little tab called “Development” under plugins:
So as a challenge I’ve decided to have a go at making my own plugin for XD and make a blog post about it.
Notes
XD plugins use JSON and JavaScript – so not too much of a leap!
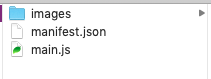
A basic XD plugin consists of a manifest.json file and a main.js file. You can also add images and other files but those two files are all that is really needed.
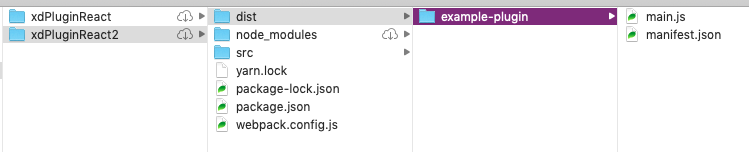
I also then split the files so there was a distribution folder as I don’t want to include development files in the final version that gets moved to Adobe XD.
I’ve documented that in this post here. Following those steps you end up with:
Once the plugin is finished it is the example-plugin folder that is copied into the Adobe XD develop folder.
Finally I can update the package.json file. Note : “private”: true means that it can’t be published by accident 🙂
There is a console you can use for catching error messages. Go to Plugins -> Development -> Developer Console
Setting a Task / Brief
I generally learn more when I’m trying to do something. So now I’ve got the Quick Start Tutorial working and gone through some of the introduction tutorials + the Quick Start React Tutorial. I’m going to set myself a simple task to learn more.
I’m going to create a Lorem Ipsum generator (I know these already exist but I thought I would start with something that appeared to be simple then expand on it. Plus once I’ve got it working I can try bringing in some more fun Lorem Ipsum Generators rather than the boring standard one).
Requirements
Insert Lorem Ipsum into a rectangle
Fetch the Lorem Ipsum from a file
Get the last selected font settings as default
Allow user to change default font settings.
Challenge Requirements
Allow user to choose type of Lorem Ipsum.
Allow user to change the settings on how much lorem ipsum they need, paragraphs, lines, words e.t.c.
I then changed the first line of the main.js to include the text scenegraph element.
const { Rectangle, Text, Color } = require("scenegraph");
I replaced the “enlargeRectangle” function in the create function with my own function called “replaceWithLoremIpsum”
 function replaceWithLoremIpsum() {
    const { editDocument } = require("application"); // [3]
    let coords;

    // Edit the Document...
    editDocument({ editLabel: "Insert Lorem Ipsum." }, function(selection) {

        // Currently Selected Rectangle.
        const selectedRectangle = selection.items[0]; // [7]

        // Get the Rectangle's Coordinates.
        coords = selectedRectangle.boundsInParent;

        // Create a new Text Node
        const node = new Text();

        // Text Settings
        node.text = "Lorem Ipsum will go here...";
        node.fill = new Color("#1f1f1f");
        node.fontSize = 50;

        // Match the selected Rectangles area and location.
        node.areaBox = {width: coords.width, height: coords.height};
        node.translation = {x: coords.x, y: coords.y };

        // add the new text box.
        selection.insertionParent.addChild(node);

        // Hide the selected rectangle (keeping it in case the user still needs it.
        selectedRectangle.visible = false;

    });
  }
This function takes the currently selected rectangle, records the coordinates and dimensions of the rectangle, creates a new Text node, Adds some text to the new text node, Sets some text settings, Changes the Text node to a fixed width and height that matches the selected rectangle (otherwise it just sets an auto height & width), Moves the Text area to the same coordinates as the selected rectangle, Add the new text node to the artboard, Hides the selected rectangle from the user view.
I decided to keep the rectangle rather than removing it incase the user still needs it. They can always delete it if they prefer.
I then updated the querySelector to use my new function rather than the enlargeRectangle function.
I’ve created a text folder in the plugin directory with a file called latin.json that has the Lorem Ipsum reference text in it.
{
    "content" : "Lorem ipsum dolor sit amet, conse",
}
I added a variable near the top to act as a container for the selected lorem ipsum.
let textToAdd = "Lorem Ipsum will go here..."; // Container for the Lorem Ipsum text to add...
I added a new function to the create function to handle the generation of the Lorem Ipsum text. I’ve written it in this way as I’m intending to expand on it later.
/**************************************************************
FUNCTION TO FETCH LOREM IPSUM
**************************************************************/
function fetchLoremIpsum() {

	const noScentences = 7;	// Total number of scentences to include in a paragraph
	const noParagraphs = 2;	// Total number of paragraphs to include

	// Fetch the lorem ipsum.
	const latin = require("./text/latin.json");

	// Split text into scentences
	let scentences = latin.content.split('.');

	// Clear any existing text
	textToAdd = '';

	// keep adding scentences so long as we have enough scentences per paragraph.
	for(let i = 0; i < (noScentences * noParagraphs); i++) {
		textToAdd += scentences[i]+'.';

		// if we've reached the total number of scentences per paragraph
		if(i > 0 && (i % noScentences) === 0) {
			textToAdd += '\n';	// add a line break.
		}
	}

}
Then I change the new text node to use the textToAdd variable rather than a set string.
node.text = textToAdd;
Get the last selected font settings as default
I initially wasn’t sure if this would be possible but I thought there probably would be a way to select existing nodes in the document without the user indicating one.
I added a new container variable for the last submitted text node settings at the top of main.js
let lastSubmittedText; // Container for Last Submitted Text Node
I then created a new function in the create function called findTextSettings.
    /**************************************************************
        FUNCTION TO FIND PREVIOUS TEXT SETTINGS
        Parameters that are passed down are Contextual Arguments
        ( https://adobexdplatform.com/plugin-docs/reference/structure/handlers.html#contextual-arguments )
    **************************************************************/
    function findTextSettings(selection, documentRoot) {

        // for each node in the document....
        documentRoot.children.forEach(node => {

            // Check if node is a child of Artboard
            if(node instanceof Artboard) {
                let artboard = node;

                // Filter out the child nodes that are Text nodes and set as text
                let text = artboard.children.filter(artboardChild => {
                    return artboardChild instanceof Text;
                });

                let lastText = text[(text.length - 1)];

                // Set last submitted Text settings.
                lastSubmittedText = {
                    fill : lastText.fill,
                    fontSize : lastText.fontSize
                };

            }

        });

    }
I modified the example function for selecting rectangles in the artboard to select text nodes instead and to update the container variable with the new data.
Note about Contextual Arguments: https://adobexdplatform.com/plugin-docs/reference/structure/handlers.html#contextual-arguments
The documentRoot parameter needs to be added to the editDcoument function for this to be passed down.
There are more settings than this so I am now going through and adding all the rest of the settings.
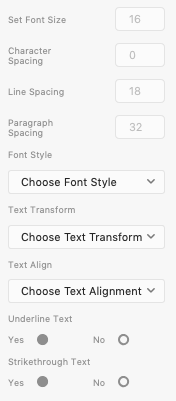
Allow user to change default font settings.
Although fetching the last selected settings is useful as a fallback, I think the user should be able to change the text settings before they import the Lorem Ipsum.
This means adding in some inputs to the main form.
I’ve decided to learn how to use react.js in order to create my XD plugin. I felt the best way to start was probably to go through some of React’s basic tutorials and write down my notes as I go along.
Chrome and Firefox have addons for debugging and inspecting React.js componants.
“Immutability makes complex features much easier to implement. Later in this tutorial, we will implement a “time travel” feature that allows us to review the tic-tac-toe game’s history and “jump back” to previous moves. This functionality isn’t specific to games — an ability to undo and redo certain actions is a common requirement in applications. Avoiding direct data mutation lets us keep previous versions of the game’s history intact, and reuse them later.”
“Detecting changes in immutable objects is considerably easier. If the immutable object that is being referenced is different than the previous one, then the object has changed.”
this.state : refers to the current component this.props : refers to the parent component
Taking it Further
The React tutorial has a few suggestions for taking the tic tac toe game example further. I’m going to have a go at them and see if I can complete them.
Display the location for each move in the format (col, row) in the move history list.
I’m going to modify the history constant to also record the location of the move (so I don’t have to do things like comparing arrays which is probably more complicated).
class Game extends React.Component {
    constructor(props) {
        super(props);
        this.state = {
            history: [{
                squares: Array(9).fill(null),
                location: null,
            }],
            stepNumber: 0,
            xIsNext: true,
        };
    }
    // Rest is the same...
}
Then in the handleClick(i) I modified the setState to record the location.
Then I change the render() function in the Game class to the following:
render() {
    const history = this.state.history;
    const current = history[this.state.stepNumber];
    const winner = calculateWinner(current.squares);

    const moves = history.map((step, move) => {
        const desc = move ?
            'Go to move #' + move + ' Location: #' + history[move].location :
            'Go to game start';
        return (
            <li key={move}>
                <button onClick={() => this.jumpTo(move)}>{desc}</button>
            </li>
        );
    });

    // rest is the same....
}
So it is now displaying the location. However the challenge was to show the column and the row so I need to translate that number into the column and row.
I ended up creating an array of all the possible locations in handleClick()
This checks if the current move number matches the overall step number. If it does it adds some bold tags.
Things I noticed….
You don’t need to enclose the html in quotes The variable being referenced has to be in one of the parent elements (which makes sense) and it has to be passed from the parent element to the child element. For some reason the last desc doesn’t need brackets – I’m not sure why this is the case at present. I’m assuming it’s because there’s no html so the brackets just escape the variable from the html string? If there was html I suspect it would need brackets.
Rewrite Board to use two loops to make the squares instead of hardcoding them.
I found this a bit tricker to solve but my solution ended up as follows:
Added a variable to the state of the Game component
This should recieve the current row numer (e.g. 0, 1 or 2 for each of the 3 rows).
The counter will always start at the current row number times the total number of columbs. e.g.
If the number of columns is 3
0 * 3 = 0 // Start on Cell Number 0 1 * 3 = 3 // Start on Cell Number 3 2 * 3 = 6 // Start on Cell Number 6
A for loop is then run to create the number of columns specified. Each key is then calculated by the current Cell Number + the current column number. e.g
Row 0:
Cell Number Start 0 + Column 0 = Key 0 Cell Number Start 0 + Column 1 = Key 1 Cell Number Start 0 + Column 2 = Key 2
Row 1:
Cell Number Start 3 + Column 0 = Key 3 Cell Number Start 3 + Column 1 = Key 4 Cell Number Start 3 + Column 2 = Key 5
Row 2:
Cell Number Start 6 + Column 0 = Key 6 Cell Number Start 6 + Column 1 = Key 7 Cell Number Start 6 + Column 2 = Key 8
Each column then adds a square with the relevant key to an array. Finally the finished row is returned by the function.
Added a function called renderRows to the Board component:
   renderRows() {
        let gameBoard = [];

        for(let i=0; i < this.props.rows; i++) {
            gameBoard.push(this.renderRow(i));
        }
        return gameBoard;
    }
For each row the renderRow function is run and adds the result to the gameBoard array which is then returned by the function.
Finally I edited the render function to the below:
Then I edited the Render Square function so the code sets the id and the className. I’m not sure which I’m going to use but this will give me a couple to try.
Installing Node.js also installs a copy of npm. According to npm the copy of npm that Node.js installs is often out of date so I followed their instructions to install.
npm install npm@latest -g
Permissions Error
Note: If like me you get a permissions error just add sudo to the start. Only ever do this if you know what you are installing however!
Once I had finished that I went through the webpack basic tutorial in Terminal to get an idea what it was for.
The XD Plugin React tutorial I was following also uses Yarn so installed that as well. Yarn uses homebrew to install which I already have installed (it’s very useful).
The basic steps when creating a project that will be using a package library seems to be:
Create a Project folder (mkdir)
Navigate to above folder (cd)
Create a package.json file (init) without asking questions ( -y )
But when you finish that you end up with the main.js file located inside your development folder. You won’t want to copy the entire thing into Adobe XD because you don’t need all of it.
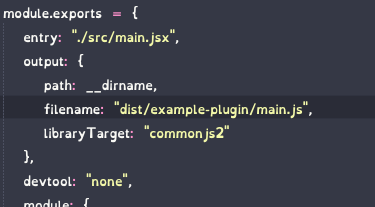
Adding a Distribution Folder
We want to end up with this instead:
The example-plugin folder in the dist (distribution) folder is the one that gets copied to Adobe XD.
This creates the dist folder Then Creates the example-plugin folder inside the dist folder Moves the manifest.json (a file which Adobe XD needs) to dist/example-plugin Deletes the currently compiled main.js
Then we need to change a couple of things. Open package.json and change the following line :
"main": "dist/example-plugin/main.js",
Open webpack.config.js and change the following line in the output section:
filename: "dist/example-plugin/main.js",
This is what it should look like.
If I run yarn now this will create the main.js in the desired location
This post is a work in progress and is mainly documentation on things I have discovered / learned while working on a project. There are probably better ways of doing some of this.
Some uploader settings
dropzone : This is the container element where the user will be dropping files. This triggers the drop files here when files are dragged over the element.
container : To confirm
browser : To confirm
error : Error handler e.g. function(e){ }
success : This fires when a file has been uploaded (it fires for each file that has been added).
added : This fires as each file is added to the drop zone (it fires for each file added).
progress : This fires while the file is being uploaded, (it fires for each file that has been added).
complete : I’ve never seen this fire so far so I’m not sure what triggers it.
refresh : I think this fires if the instance is refreshed but I haven’t confirmed.
uploader: {
	dropzone:  $('.dragzone'), // The dropzone container
	container: $('.dragzone'),
	browser:   'browse_button',
	error: function(e) {	// if there is an error during upload this should fire.

		console.log(e);
		console.log('error');

	},
	success: function(e) {	// once a file is uploaded this should fire.

		//console.log(e);
		//console.log('success');

		fileTemplate(e);

		noItemsUp++; 	// update the number of items uploaded.
		prevProgress = Math.floor(progressBar);
		progressBar = Math.floor(percent * noItemsUp);

		animateProgress();

		$('#importFiles').prop('disabled', false);

	},
	added: function(e) {	// this fires when a file is added.

		noItems++; 	// add 1 to the number of items being uploaded
		percent		= 100 / noItems;	// work out the new percentage per item...
		prevProgress 	= progressBar;	// This is needed so the animated counter can work
		progressBar 	= percent * noItemsUp;		// This is the new progress the bar needs to move to.

		animateProgress();

	},
	progress: function(e) {	// this fires while the file is being uploaded.
		//console.log(e);
		//console.log('progress');
	},
	complete: function(e) { // ?
		//console.log(e);
		//console.log('complete');
	},
	refresh: function(e) { // ?
		//console.log(e);
		//console.log('refresh');
	}
}
The task : create a single file upload field on the add / edit page of a custom post type within a WordPress plugin. The file should use the WordPress media library functionality to upload and select the file.
I’ve added some screenshots of the finished field. I’ve added the field into the “Add New Custom Post Type” form using a meta box.
When the “Add the File” button is clicked (or the input field) the WordPress media library modal should appear.
I’ve modified the parameters to change the title of the modal window and the text on the button.
Once a file has been selected and chosen the information in the file preview box is filled out:
The Code
To use the WordPress Media api you need to include the media library scripts so that your custom script can access its functionality. To do this you will need to create a function for “enqueue”-ing scripts to your WordPress admin. Mine is created as part of a class for my plugin:
// Set some constants
defined( 'FMPLUGINURL' ) or define( 'FMPLUGINURL', plugin_dir_url( __FILE__ ) );

class FileManager {

	// Initialise the plugin
	public static function init() {
		add_action('admin_enqueue_scripts',['FileManager','queue_assets']);
	}

	// Add your assets to the admin view.
	public static function queue_assets() {

		// Checks that it's in the admin view
		if(is_admin()) {
			wp_enqueue_media(); // WP Media API
			wp_register_script( 'fm_media_uploader', FMPLUGINURL.'assets/js/fm_media_uploader.js');        // Customised WP media Upload Script for this plugin.
			wp_localize_script( 'fm_media_uploader', 'FMPLUGINURL', FMPLUGINURL );
			wp_enqueue_script('fm_media_uploader');
		}
	}
}

FileManager::init();
The above code adds all the assets necessary for using the media JavaScript API.
The fm_media_uploader file is where I am adding all the custom JavaScript to hook into the media API.
fm_media_uploader.js
First we need to setup an instance of the Media Library Modal which I will be storing in the variable below.
// Set some required variables
var mediaUploader;
We also will need a trigger so that the Media Library Modal will open when certain elements are clicked.
// Set some required variables
var mediaUploader;

// Set the triggers
$('#mediaUpload, .file-field input, .file-options a').on("click", function(e) {

	// This just prevents any default functions from occuring e.g. stops a form from submitting.
	e.preventDefault();

});
The instance of the media uploader will be created once the trigger is clicked.
// Set the media uploader with the following parameters
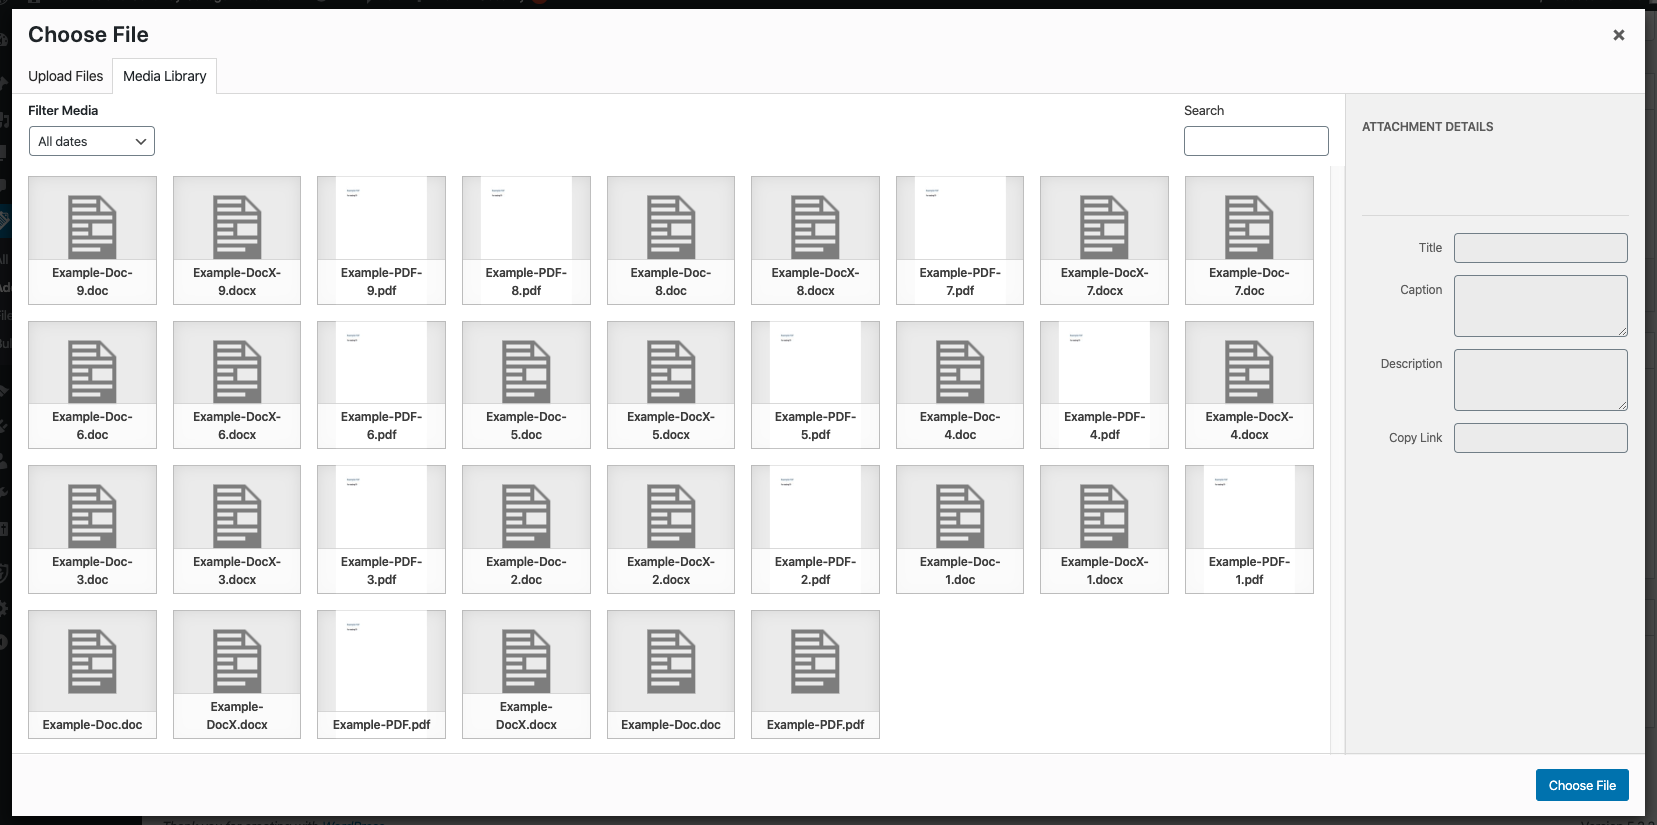
mediaUploader = wp.media.frames.file_frame = wp.media({
title: 'Choose File', // Title at the top of the Modal Window
button: { // Button Parameters
text: 'Choose File', // Button Text
},
multiple: false // Allow multiple file uploads?
});
This sets up an instance of the Media Library Modal while modifying the title of the window and the button parameter. There is also an option to upload multiple or single files. There may be more parameters but these are the ones I know about so far. I may add to this post (and my next one) as I learn more.
This is how the modal window will look once triggered.
Finally we will tell the modal window to open:
// open the Media Uploader.
mediaUploader.open();
So once the Add File button is clicked the WordPress Media Library modal window will appear and allow you to select a file. However you may find two problems:
You can’t open the same modal window a second time.
Nothing happens to the file once it is selected.
Prevent Multiple Instances
The reason you might have problems clicking the button a second time is that it is trying to create multiple instances on the same variable. So we need to add some code so the creation part is skipped if the instance has already been created.
if (mediaUploader) {

	// open the media uploader.
	mediaUploader.open();
	return;

}
If an instance of the Media Library Modal already exists it simply opens to existing instance and skips the part tht creates the instance.
I think this part could be cleaner. It is something I’m planning on revisiting later.
Handling the Selected File
The following piece of code handles the selected file and should be added when the instance of the Media Library Modal is created but before it is opened.
I may rewrite this bit in the future, as I think it could be neater.
// When a file is selected in the modal window....
mediaUploader.on('select', function() {

	var attachment = mediaUploader.state().get('selection').first().toJSON(); 	// the selected file is added to the selection list
	var fileDescription = $('textarea[name="FMDescription"]').val(); 		// get current File Description
	var file = attachment.filename.split('.');												// get the filename and split into an array.

	file.reverse();		// reverse the array to make it easier to get the file extension

	$('.file-type').text('.'+file[0]);                                    		// File Extension
	$('input[name="FMFile"]').val(attachment.url);          // File URL
	$('.file-header').text(attachment.title);                         	// File Title

	if(fileDescription == '') {
		$('textarea[name="FMDescription"]').val(attachment.description);
	} // Set File Description if nothing has been filled in yet...

	$('.upload-date').text(attachment.dateFormatted);            // File Upload Date Formatted (this will use WordPress's default setting)
	$('.file-size').text(attachment.filesizeHumanReadable);      // File Size
	$('.file-options .edit').attr('href', attachment.editLink).text('Edit');
	$('input[name="FM_attachment_id"]').val(attachment.id);     // Attachment (file) ID

	var date = $('#jquery-datepicker').val();

	if(date) {
		$('input[name="FMTitle"]').val(attachment.title+' '+date);
	}

});
This may have more code than you need as I’ve taken it from my own project.
First we have an event listener that runs a function when the ‘select’ event is triggered on the Media Library Modal instance.
mediaUploader.on('select', function() { });
Then we need to collect all the details of the file that has been selected. This is returned in JSON format.
var attachment = mediaUploader.state().get('selection').first().toJSON();
The rest of the code is just me telling the script to fill in various fields with the file data to display it like below:
Handling Edit Mode
When the custom post type is reopened in edit mode; it should automatically have the file selected when the file field is clicked. However at present the script won’t let this happen. We need to add some additional code to make this happen.
var fileID = $('input[name="FM_attachment_id"').val();
First we grab the attachment ID (I use a hidden field to store this in the Meta Box).
Then in both the open existing mediaUploader statement and the mediaUploader.on(‘open’, function()) we need to add the following:
if(fileID) {
	// select the file ID to show it as selected in the Media Library Modal.
	mediaUploader.uploader.uploader.param( 'post_id', parseInt(fileID) );
	var selection = mediaUploader.state().get('selection');
	selection.add(wp.media.attachment(fileID));
}
It needs to be added twice because you might try and edit after you’ve added a file or when you are opening an existing custom post type. So it needs to check both in the creation of the instance and when an existing instance is opened.
I’m planning on working on this to try and make it neater and not repeat the same code twice but hey it works for now.
The Full Code
This is the current javaScript code in full…
// Set some required variables
var mediaUploader;

// Set the triggers
$('#mediaUpload, .file-field input, .file-options a').on("click", function(e) {

	// This just prevents any default functions from occuring e.g. stops a form from submitting.
	e.preventDefault();

	// Fetch the value of the currently selected File - if nothing has been selected this will be empty
	var fileID = $('input[name="FM_attachment_id"').val();

	// If there is already a Media Library Modal only this block will run as it doesn't need to be initialised again.
	if (mediaUploader) {

		// This should only be run if a file has already been selected
		if(fileID) {

			// when the media library modal is opened....
			mediaUploader.on('open', function() {

				// if there's a file ID
				if(fileID) {
					// select the file ID to show it as selected in the Media Library Modal.
					mediaUploader.uploader.uploader.param( 'post_id', parseInt(fileID) );
					var selection = mediaUploader.state().get('selection');
					selection.add(wp.media.attachment(fileID));
				}
			});

		}

		// open the media uploader.
		mediaUploader.open();
		return;

	}

	// Set the media uploader with the followign parameters
	mediaUploader = wp.media.frames.file_frame = wp.media({
		title: 'Choose File',		// Title at the top of the Modal Window
		button: {						// Button Parameters
			text: 'Choose File',	// Button Text
		},
		multiple: false 			// Allow multiple file uploads?
	});

	// When the Media library Modal is opened...
	mediaUploader.on('open', function() {
		// if there is a file ID...
		if(fileID) {
			// select the file ID to show it as selected in the Media Library Modal.
			mediaUploader.uploader.uploader.param( 'post_id', parseInt(fileID) );
			var selection = mediaUploader.state().get('selection');
			selection.add(wp.media.attachment(fileID));
		}
	});

	// When a file is selected in the modal window....
	mediaUploader.on('select', function() {

		var attachment = mediaUploader.state().get('selection').first().toJSON(); 	// the selected file is added to the selection list
		var fileDescription = $('textarea[name="FMDescription"]').val(); 		// get current File Description
		var file = attachment.filename.split('.');												// get the filename and split into an array.

		file.reverse();		// reverse the array to make it easier to get the file extension

		$('.file-type').text('.'+file[0]);                                    		// File Extension
		$('input[name="FMFile"]').val(attachment.url);          // File URL
		$('.file-header').text(attachment.title);                         	// File Title

		if(fileDescription == '') {
			$('textarea[name="FMDescription"]').val(attachment.description);
		} // Set File Description if nothing has been filled in yet...

		$('.upload-date').text(attachment.dateFormatted);            // File Upload Date Formatted (this will use WordPress's default setting)
		$('.file-size').text(attachment.filesizeHumanReadable);      // File Size
		$('.file-options .edit').attr('href', attachment.editLink).text('Edit');
		$('input[name="FM_attachment_id"]').val(attachment.id);     // Attachment (file) ID

		var date = $('#jquery-datepicker').val();

		if(date) {
			$('input[name="FMTitle"]').val(attachment.title+' '+date);
		}

	});

	// open the Media Uploader.
	mediaUploader.open();

});
Meta Box HTML
For reference this is the meta box HTML, it is also part of a PHP class.
I came across this odd bug. This only occurs if you try to upload a file before selecting a file. However if you select a file, then go back and try and upload a file it then works?
If I added the following to the mediaUploader it worked as it should, however this had the effect of losing the title option. I believe the title and button options only work on a custom frame.
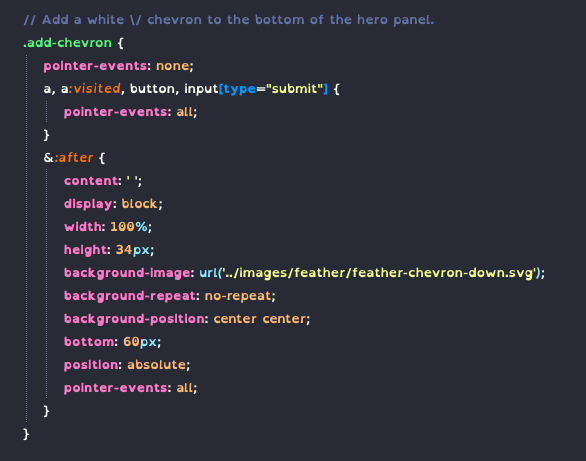
This is maybe only needed in some edge cases, but you can use pointer-events to make psuedo elements (:after and :before) clickable via javascript.
Note: Preferable to use clickable elements if you can though!
My original code when I needed this as a work around.
SCSS Code
.add-chevron {
    // prevents clicking on element from working
    pointer-events: none;

    // Necessary for allowing any clickable elements within the parent to work.
    a, a:visited, button {
        pointer-events: all;
    }
    &:after {
        content: 'click me';
        display: block;
        height: 34px;
        width: 34px;
        // allows this pseudo element to be clickable
        pointer-events: all;
    }
}